Key takeaways
- Turn the fan off and wait until the blades stop completely. For extra caution, switch off the wall control or circuit if you will be working near the motor housing.
- Move chairs, side tables, and fragile décor out of the area so you have a clear path beneath the fan.
- Place an old sheet, towel, or flattened box beneath the fan to catch loose debris. This is especially helpful over beds, sofas, and dining tables.
- Inspect the duster head and pole connections. A loose attachment can drop dust onto the room or become difficult to control overhead.
What's inside
Ceiling fan blades are easy to overlook, yet they collect a surprisingly thick layer of dust, hair, and cooking residue. When the fan starts, that buildup can scatter through the room, settle on furniture, and aggravate allergy symptoms. Cleaning the blades regularly also helps preserve a fan’s appearance and keeps dust from becoming a sticky, difficult-to-remove film.
The best method is simple: control the dust before it falls, use a tool that reaches the blades without forcing you onto unstable furniture, and finish with a lightly damp wipe when necessary. This guide explains how to clean ceiling fan blades safely, how to choose the right duster for a small home, and when a reusable microfiber tool is more practical than a ladder or disposable wipes.
As an Amazon Associate we earn from qualifying purchases.


Choose a Tool That Fits Your Room
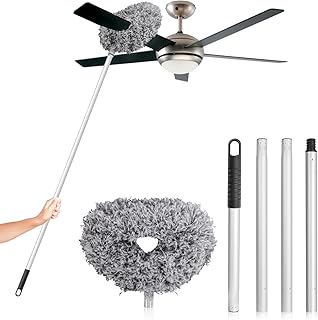
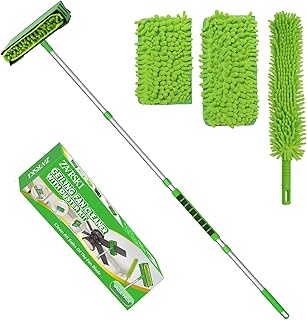
For most homes, a flexible microfiber fan duster with an adjustable pole is the most useful starting point. It can reach blades from the floor, folds into a closet, and often works on other neglected surfaces such as door tops, bookshelves, baseboards, and wall corners. A washable head is particularly helpful in small spaces because it reduces the need to store boxes of disposable cleaning supplies.
The DRQ Ceiling Fan Cleaner Duster and SetSail Ceiling Fan Cleaner Duster both use a removable microfiber duster and an extension range of roughly 13 to 48 inches. That compact-to-extended range is useful in apartments with standard-height ceilings. The similarly designed Ceiling Fan Cleaner Duster with Adjustable Pole extends to about 49.7 inches, while the FONUNO Ceiling Fan Cleaner Duster reaches approximately 50 inches. Check the measurements against your ceiling height before buying; pole length is not the same as total reach once your arm height is considered.
For unusually tall ceilings, a dedicated tool with more reach may be preferable. The Ceiling Fan Cleaner Duster with 6 Ft/72” Extension Pole is designed for higher surfaces, although a long pole can feel heavier and less precise. If storage space is tight, a shorter, lighter model is often the better everyday choice.
Prepare Before You Clean
- Turn the fan off and wait until the blades stop completely. For extra caution, switch off the wall control or circuit if you will be working near the motor housing.
- Move chairs, side tables, and fragile décor out of the area so you have a clear path beneath the fan.
- Place an old sheet, towel, or flattened box beneath the fan to catch loose debris. This is especially helpful over beds, sofas, and dining tables.
- Inspect the duster head and pole connections. A loose attachment can drop dust onto the room or become difficult to control overhead.
Do not stand on a rolling chair, sofa arm, or stacked storage bin. If the blades remain out of reach with a suitable pole, use a stable step ladder or ask another person to assist. Small-space organization is partly about preventing one cleaning task from creating a repair or safety problem.
How to Clean Ceiling Fan Blades
Start with a dry microfiber head. Position it so the blade is enclosed or supported rather than brushed aggressively from the side. Work from the blade’s inner section near the motor toward the tip using slow, even strokes. This keeps the dust moving in one direction and reduces the chance of sending it into the air.
Clean the top surface first, then lightly pass over the underside and the blade edges. Rotate the fan by hand only after it has fully stopped, and clean one blade at a time. Avoid pulling down on the blades or using the pole to spin the fan. Excessive pressure can stress the blade brackets or leave the fan unbalanced.
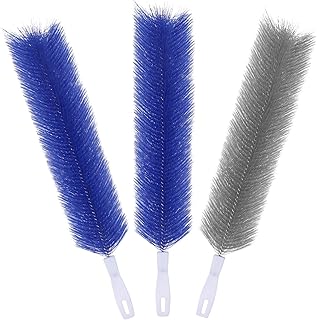
For a fan with heavy buildup, remove the microfiber head and shake or wash it according to the manufacturer’s instructions before continuing. The 3 Pcs Fan Cleaning Brush Bendable Cobweb Duster set can be useful for smaller fans, vents, curtains, and awkward corners, particularly when you want separate clean heads for different areas.
When to Use a Damp Cloth
Dry dusting is usually enough for routine maintenance. Use a barely damp microfiber cloth when the blades have a greasy film from a kitchen, residue from smoke, or dust that has bonded to moisture. Spray cleaner onto the cloth—not onto the fan—and wring it thoroughly. Excess liquid can drip into the motor housing, so the cloth should feel damp rather than wet.
Support each blade with one hand while wiping with the other if you are using a ladder. Avoid abrasive sponges, strong solvents, and soaking the blade surface. Afterward, use a dry cloth to remove remaining moisture. If the blades are made from wood, pressed material, or a delicate painted finish, test the cleaning solution on a small inconspicuous area first.
Keep the Fan Cleaner for Longer
A quick dusting every one to two weeks prevents the thick layer that makes deep cleaning unpleasant. Homes with pets, smokers, open windows, or frequent cooking may need more frequent attention. Store the duster where it is easy to retrieve—inside a utility closet, behind a door, or alongside a vacuum attachment—rather than burying it in a hard-to-reach bin.
Wash microfiber heads separately from lint-producing towels when possible. Skip fabric softener, which can reduce microfiber’s ability to attract dust, and allow the head to dry fully before storing it. Labeling a reusable head “fan only” can also prevent cross-contamination between ceiling fixtures and dirtier surfaces.
Tips
- Clean ceiling fans before vacuuming or mopping so fallen dust is removed at the end.
- Use a pillowcase over a blade for very dusty fans: slide it over gently, then pull it back to contain debris.
- Keep the pole short for nearby blades and extend it only as much as needed for better control.
- Check for wobbling after cleaning; a loose blade screw or bracket may need attention before regular use.
Frequently Asked Questions
How often should ceiling fan blades be cleaned?
Every one to two weeks is a practical schedule for many homes. Dusty rooms, pets, allergies, and kitchens may call for weekly cleaning, while a rarely used guest-room fan may need attention less often.
Can I clean fan blades while the fan is running?
No. Turn the fan off and wait for complete stoppage before touching the blades. Cleaning a moving fan is unsafe and can damage the blade brackets, duster, or motor.
Is a ceiling fan duster better than a vacuum?
A vacuum with a soft brush attachment can work well when the blade is reachable, but an adjustable microfiber duster is often lighter, quieter, and easier to use from the floor. For high ceilings, choose the tool that offers control without requiring an unsafe stretch.
What should I do if dust keeps falling from the blade?
Use slower strokes and support the duster head against the blade instead of flicking across it. A sheet beneath the fan will catch remaining debris. For greasy buildup, follow dry dusting with a carefully wrung, damp microfiber cloth.
Conclusion
The best way to clean ceiling fan blades is to work slowly with a washable microfiber tool, contain the dust, and use minimal moisture. An adjustable duster such as the DRQ, SetSail, FONUNO, or another appropriately sized model can also simplify cleaning across a small home. Choose reach and maneuverability over the longest pole available, and make light dusting part of your regular cleaning routine.