Key takeaways
- Clean in the direction the blades already point, working from the center outward, so gravity helps rather than fights you.
- Wash microfiber sleeves separately from cotton laundry and skip the fabric softener, which clogs the fibers and kills their grab.
- Set a reminder for every three to four weeks. A light layer takes two minutes; three months of buildup takes twenty and makes a mess.
- Add your reversible fan’s seasonal switch flip to the same routine so you handle the whole fan in one visit.
What's inside
Ceiling fan blades are dust magnets in a way few surfaces are. The blade edges collect static charge as they spin, then attract airborne particles that settle on the top face where nobody looks. In a small apartment, that hidden layer matters more than it would in a sprawling house: the fan is often the only air mover in the room, so every time you flip the switch, that accumulated grit gets redistributed across your bedding, your desk, and your lungs. Compact spaces also mean you’re physically closer to the fan, and there’s rarely room to swing a full-size ladder into position.
This guide covers the technique that actually removes dust instead of relocating it, how to choose a tool that fits both your ceiling height and your storage closet, and what to do about the greasy film that builds up on fans near a kitchen. Below you’ll find our recommended picks, followed by the method and the small details that separate a five-minute job from a re-cleaning of the whole room.
As an Amazon Associate we earn from qualifying purchases.



Start With Containment, Not Cleaning
Before you touch a blade, deal with what’s underneath. Spread an old sheet or a couple of towels across the bed, sofa, or floor directly below the fan. In tight rooms where furniture can’t be moved, drape it instead of relocating anything. Turn the fan off and let it come to a complete stop, then confirm the wall switch is down. A blade that’s still coasting will slap a duster sideways and fling dust in an arc. Working in still air also means anything you dislodge falls straight down onto your drop cloth rather than drifting.
Trap the Dust Instead of Sweeping It
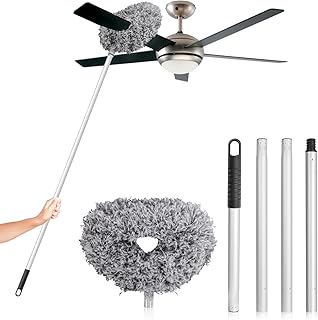
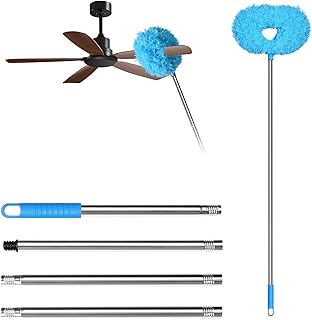
The single biggest technique error is treating a fan blade like a countertop and wiping side to side. That launches dust into the air. What works is a sleeve-style duster that wraps the blade top and bottom simultaneously, so you’re pulling the debris into a fabric pocket. Slide it on at the motor housing and draw it outward toward the tip in one continuous motion, then repeat. Microfiber’s split fibers hold particles electrostatically, which is why a slightly damp cloth or a dry microfiber sleeve outperforms a feather duster by a wide margin. Sleeve-style tools like the DRQ Ceiling Fan Cleaner or the FONUNO extended fan blade cleaner are built around this pinch-and-pull design, with removable heads you can toss in the wash.
Match the Pole to Your Ceiling and Your Closet
Reach is the deciding factor, but so is collapsed length if you live somewhere small. Most telescoping fan dusters extend from roughly 13 inches to somewhere between 48 and 50 inches, which is enough to reach an eight-foot ceiling comfortably from standing height. The Storystore adjustable duster reaches about 4.2 feet fully extended and shrinks down to fit in a narrow gap beside a washing machine or behind a door. For nine- or ten-foot ceilings, vaulted entryways, or lofted studios, the Eyliden 68-inch adjustable duster buys you real headroom without a ladder, and at three-quarters of a pound it won’t turn your shoulders to jelly halfway through. Weight matters more than people expect when you’re holding a tool overhead at full extension.
Handle Kitchen Grease and Stubborn Buildup Differently
Fans within a room or two of a stove accumulate a sticky film that dry dusting only smears. For those, remove the loose layer first with a dry sleeve, then follow with a cloth barely dampened with warm water and a drop of dish soap. Wring it until it’s almost dry: water running down a blade into the motor housing is a genuine hazard, and moisture can warp inexpensive pressed-wood blades. Dry each blade immediately afterward. Never spray cleaner directly at a mounted fan.
Reach the Parts a Sleeve Duster Misses
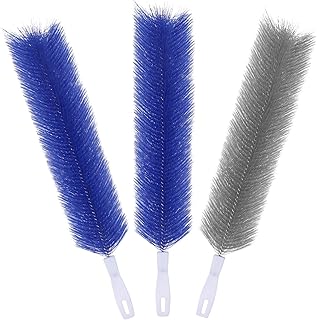
Blades are the visible problem, but the motor housing, the pull chains, the upper side of the light fixture, and the ceiling canopy all collect their own share. A bendable microfiber brush set such as the 3-piece cobweb duster handles these odd geometries, since you can shape the head to hook over a housing curve or slip between a shade and its bracket. These are also the tools worth keeping for air vents and window tracks, which is a real advantage when storage space is at a premium.
Tips
- Clean in the direction the blades already point, working from the center outward, so gravity helps rather than fights you.
- Wash microfiber sleeves separately from cotton laundry and skip the fabric softener, which clogs the fibers and kills their grab.
- Set a reminder for every three to four weeks. A light layer takes two minutes; three months of buildup takes twenty and makes a mess.
- Add your reversible fan’s seasonal switch flip to the same routine so you handle the whole fan in one visit.
Frequently Asked Questions
How often should ceiling fans be dusted?
Monthly is a reasonable baseline. Bump that to every two weeks if you have pets, run the fan continuously, or live somewhere with high pollen or construction dust nearby.
Can I use a vacuum with a brush attachment instead?
You can, and it works well if you have a lightweight stick vacuum with an extension wand. The drawback in small spaces is maneuverability: a hose overhead is awkward, and hard attachment edges can scratch blade finishes.
Do I need to remove the blades to clean them properly?
No. Removal is only necessary for deep restoration on a badly neglected fan, and it introduces the risk of over-tightening or misaligning screws, which causes wobble.
Why does my fan still look dusty right after cleaning?
Usually the sleeve was already saturated and started depositing rather than collecting. Flip or swap heads partway through a full fan, and check the pull chains and housing, which are easy to overlook.
Conclusion
A clean fan comes down to three things: stop the blades, trap the dust in a microfiber sleeve rather than brushing it loose, and pick a pole that reaches your ceiling while still storing somewhere sensible. Get those right and a task most people dread becomes a short, unremarkable part of your monthly routine, with noticeably better air in the room to show for it.