Key takeaways
- A diy barn door tv stand combines a low media cabinet with a sliding cabinet door on a track. Begin by sizing the case around your television and choosing cabinet-rated hardware; then build a rigid box, fit the door, and…
A diy barn door tv stand combines a low media cabinet with a sliding cabinet door on a track. Begin by sizing the case around your television and choosing cabinet-rated hardware; then build a rigid box, fit the door, and anchor the finished setup. Decorative trim is optional. Stable TV support is not.
As an Amazon Associate we earn from qualifying purchases.
By KK Home Furnishings Editorial Team
Plan and Measure Your Barn Door TV Stand
This project differs from a basic farmhouse console because the door has to travel freely across the cabinet opening. The track, door overlap, and hardware stops affect the layout before a single panel is cut. Treat a sample plan as a starting point, not a substitute for checking your particular television and hardware.
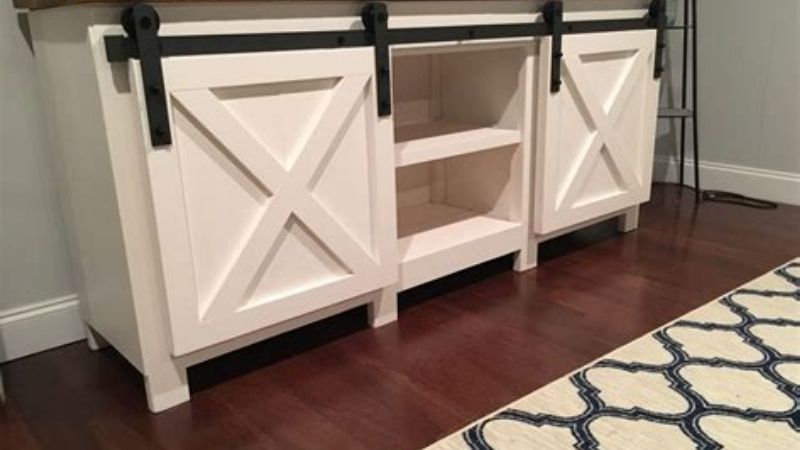
Size the Cabinet to Your TV and Room
Measure the actual width and depth of the television feet, rather than using its advertised diagonal screen size as the stand width. Check the weight in the TV manual and determine whether the set will rest on the cabinet or use a separate wall mount. Keep the viewing height and walking clearance comfortable for your room.
For a concrete reference, a Kreg-hosted sliding-door cabinet plan specifies a 50-inch-wide, 22-inch-deep top made from 3/4-inch plywood. That is a dimension from one published cabinet project, not a universal size or certified TV load rating. Make the footprint wider when the television base requires it and reassess the support structure.
Choose Panels, Cabinet Hardware, and Tools
A practical cabinet uses plywood sides, a supported top and bottom, a divider or shelving where needed, and a back panel or structural bracing that resists racking. Kreg plans for sliding-door cabinets use 3/4-inch plywood for major case parts and 1/4-inch material for some back panels. The back panel alone must not be assumed to carry the television.
Use a sliding-door system explicitly intended for cabinet furniture, with compatible hangers, travel stops, and a lower guide. Architectural barn-door kits are sized for full doors and may not fit a media console. Check the kit instructions for door thickness, maximum door weight, rail mounting, and required clearance before making the door.
Plan the Load Path and Tip-Over Protection
The cabinet top should transfer the television load through solid supports into the base without relying on decorative trim, thin backing, or the sliding rail. Check the fasteners against the panel material and the load they are meant to carry. An attractive cabinet plan without a published load rating does not establish a safe TV weight capacity.
The U.S. Consumer Product Safety Commission advises securing TVs and furniture against tip-over hazards [CPSC, 2025]. Plan wall anchors and suitable studs or other wall-specific attachment points before pushing the cabinet into position. The TV also needs its own appropriate restraint if it is not wall-mounted; a furniture anchor does not replace TV stabilization.
| Material or Tool | Published Example or Specification | Cost Tier | Fit Check |
|---|---|---|---|
| Cabinet plywood | 3/4-inch plywood in Kreg cabinet plan | Core material | Choose suitable panel grade and verify sheet quality |
| Back panel | 1/4-inch plywood in cited cabinet plan | Core material | Add structural bracing where required |
| Sliding hardware | Cabinet-rated track, stops, guide and hangers | Variable | Match door weight, thickness and travel |
| Pocket-hole joinery | Jig and screws specified for panel thickness | Tool-dependent | Confirm screw type and edge placement |
| Wood glue and clamps | Compatible interior wood glue and clamps | Low to moderate | Follow adhesive cure guidance |
| Saw and square | Straight-cut saw, measuring tape, square | Tool-dependent | Support workpieces and check alignment |
| Anchoring hardware | Wall and TV restraints appropriate to construction | Safety essential | Use correct wall substrate and installation instructions |
How to Build a Barn Door TV Stand Step by Step
Build the case and dry-fit the door before applying finish. A sliding door needs unobstructed side travel, so decorative handles, shelf edges, and nearby walls can become obstacles. The sequence below assumes a floor-standing cabinet with a separate, cabinet-rated sliding door kit, rather than an oversized interior barn door.
Step 1: Draw the Cut Layout and Test the Door Travel
Sketch the cabinet from the front, side, and top. Record the overall case width, cabinet depth, internal opening, panel thickness, and location of each support. Mark where the sliding door sits when closed and where it moves when open. The door needs enough travel to expose the storage area without striking a wall or adjoining furniture.
Read the hardware instructions before selecting the finished door dimensions. Some systems require a specific overlap at the opening, while others specify the spacing between hangers or the track end. Put a full-size mock-up of the door on the floor using cardboard or scrap panels and check the intended reach to shelves and media devices.
Make a written cut list and identify which edges require a clean factory finish. When cutting plywood, support both sides of the sheet and use the blade and safety equipment appropriate to the saw. Ask a lumber supplier to break down full sheets if a safe sheet-cutting setup is not available. Recheck every measurement before making matching parts.
Step 2: Assemble a Square, Supported Cabinet Box
Cut the side panels and bottom to the revised plan, then dry-fit them with the cabinet upside down on a flat surface. A square case gives the sliding rail a straight reference. Use the joinery recommended for the chosen material and thickness; a plywood case can be assembled with appropriate pocket-hole screws and glue, but screw positioning still matters.
Add a center divider or internal rails under the top whenever the design calls for them. Do not substitute face-frame molding for the supports that carry the television load. Make sure adjoining panels meet fully and check the diagonal corners of the box for squareness before the adhesive sets, then clamp without forcing the case out of alignment.
Attach the top using fasteners suited to the case and top materials. If the top is solid wood rather than plywood, allow for seasonal wood movement with the appropriate tabletop connectors instead of rigidly fastening across the grain. Keep the cabinet on a flat base during assembly and do not load it with electronics while the adhesive is curing.
Step 3: Install the Back, Shelves, and Cable Access
Install the structural bracing called for by the design before adding a thin back panel. A recessed plywood back can help keep a cabinet square when properly attached, but it cannot be treated as the only load-bearing member. Fit the bottom and middle shelves and verify that any adjustable shelf hardware is seated and supported as its manufacturer requires.
Place rear cable openings where connectors can turn without sharp bends or abrasion. Do not notch critical top rails, dividers, or anchoring points just to pass a thick HDMI connector. Plan an open ventilation path around receivers and gaming consoles; their required clearances come from the equipment manuals, not the appearance of the cabinet doors.
Decide whether the door will hide storage bins or active electronics. A closed compartment that works for board games may be inappropriate for heat-producing equipment without adequate ventilation. Check device temperatures and clearance requirements during initial use. Never route power cords beneath the sliding track where a moving hanger could pinch them.
Step 4: Build the Barn-Style Door Without Excess Weight
Build the door frame around the actual track specification, not a generic decorative drawing. A simple face can use vertical stiles, top and bottom rails, and a lightweight panel, with a diagonal accent to create the familiar barn-door appearance. Keep the face flat by working on a stable surface and using clamps while checking the corners.
A diagonal brace can be decorative on this kind of cabinet door; it should not be assumed to make poorly fastened joints structural. Pre-drill near narrow edges where the wood might split, and use the fastener type recommended for the joint. Check that the combined door and hardware stay within the sliding kit’s published weight limit.
Sand the door and case before adding the running gear, taking care not to round over attachment surfaces or change fit-critical edges. Dry-fit the handle location against the full travel path. A projecting pull that looks good when closed may strike a neighboring cabinet or wall at the end of travel, so test it with the door in both positions.
Step 5: Fit the Track, Stops, and Lower Guide
Mark a level reference line for the track and locate the case structure that will support its screws. Follow the actual kit drawing for hole placement, fastener diameter, and mounting height. Screw threads need sound material; attachment through a thin cosmetic face alone is not a suitable substitute for the support specified by the hardware maker.
Install the hangers on the door at the spacing required by the manufacturer, then hang the door with assistance if it is heavy. Set the lower guide where it controls sway without binding, and fit both travel stops. If the kit includes anti-jump devices, do not leave them off for a smoother-looking installation; they serve a different function from the end stops.
Move the door by hand across its complete range before fitting electronics. It should not scrape the top, rock excessively, or pull the track away from the cabinet. Adjust according to the kit instructions rather than filing down moving parts. Repeat the test with shelving installed and make certain a child cannot easily remove the door from its rail.
Step 6: Finish, Anchor, and Check the Completed Stand
Apply a suitable interior finish to the wood and allow it to cure according to the finish label before bringing the cabinet into the living room. If buying composite panels for the project, look for the applicable TSCA Title VI compliance identification on regulated products [U.S. EPA, 2026]. This material rule does not certify the strength of the finished cabinet.
Locate the wall structure and fit an anchoring system suitable for the cabinet and wall material. Follow the anchor manufacturer’s directions, and restrain a freestanding television using a separate compatible TV safety system. The CPSC recommends anchoring TVs and furniture, especially where children may be present [CPSC, 2025]. Do not assume the cabinet’s weight prevents tipping.
Before daily use, inspect the track attachment, door stops, cabinet joints, top deflection, and electrical cable path. Place the television so its complete support footprint sits on the top without overhang and with a suitable published support rating. If the build has no defensible TV load specification, choose a proper wall-mounted TV arrangement instead of guessing.
Frequently Asked Questions
Once the cabinet is standing square and the door travels properly, most final decisions concern television fit, tools, hardware, and safe installation. The answers below address situations that change the build plan rather than repeat the cabinet assembly sequence.
How Wide Should a Barn Door TV Stand Be?
The cabinet should be wide and deep enough to fully support the television’s actual base or feet, with additional room for the hardware and storage layout. A 50-inch-wide example is not a recommendation for every screen size. Check the TV manual for its stand footprint, weight, and any instructions about appropriate supporting furniture.
A wall-mounted TV changes the cabinet’s role, but not its door clearance. Even if no TV rests on the top, the furniture must be stable and anchored appropriately. Allow space on each side for the door to travel and for users to reach the storage compartments without pulling hard on the panel.
Can I Use a Full-Size Barn Door Track on a Media Console?
Usually a cabinet-scale sliding system is the better starting point. Full-size interior barn-door hardware can have unsuitable rail length, standoff depth, hanger dimensions, and fastener requirements for a small console. A hardware rating for a room door does not establish that a plywood cabinet face can support the rail installation.
Select the kit only after measuring door thickness, assembled door weight, travel distance, and the available mounting material. A properly matched system includes means of controlling travel and preventing unwanted lifting. Use the installation sheet supplied with the exact hardware model rather than relying on a picture of a similar track.
Can I Build One Without a Table Saw?
Yes. Many cabinet projects can be assembled from accurately precut plywood panels using a suitable drill, clamps, a square, and the joinery specified by the plan. Ask the lumber retailer or a local cutting service to prepare the major sheet pieces. The important constraint is consistent sizing and square edges, not ownership of a particular saw.
Door trim can also be cut with appropriate smaller tools, provided the cuts are accurate and safely supported. If you lack experience placing structural fasteners or installing the safety anchors, have a qualified professional inspect that work. Outsourcing difficult cuts or anchoring is preferable to improvising a joint whose load behavior is unknown.
Is a Sliding Barn Door TV Stand Safe With Young Children?
It can be made safer through proper cabinet anchoring, television restraint, secure track installation, and inaccessible pinch points, but a homemade stand should not be described as childproof. A sliding door creates moving edges, and a small child may pull on the handle or try to climb shelves. A secure rail alone does not prevent a furniture tip-over.
The CPSC recommends anchoring TVs and furniture and keeping tempting objects off higher surfaces [CPSC, 2025]. In a family room, choose stops and guides that cannot easily be removed, keep heavy items low, and route cables away from children. Supervision remains necessary even when anti-tip devices have been installed.
Final Thoughts
The final decision for a diy barn door tv stand is whether the sliding mechanism and the television can each be supported by the specific cabinet you intend to build. Save the track model and TV manual with the cut list. If either support detail cannot be confirmed, revise the layout before adding decorative barn-style trim.