Key takeaways
- A practical diy tv stand farmhouse build starts with a real media-console structure, not decorative trim alone. For a classic look, use an open-shelf cabinet with a painted base and a contrasting stained top. First measure the television footprint and…
A practical diy tv stand farmhouse build starts with a real media-console structure, not decorative trim alone. For a classic look, use an open-shelf cabinet with a painted base and a contrasting stained top. First measure the television footprint and component storage; then select a published construction plan you can follow without removing supports or guessing at load capacity.
As an Amazon Associate we earn from qualifying purchases.
By KK Home Furnishings Editorial Team
Plan and Measure Your Farmhouse TV Stand
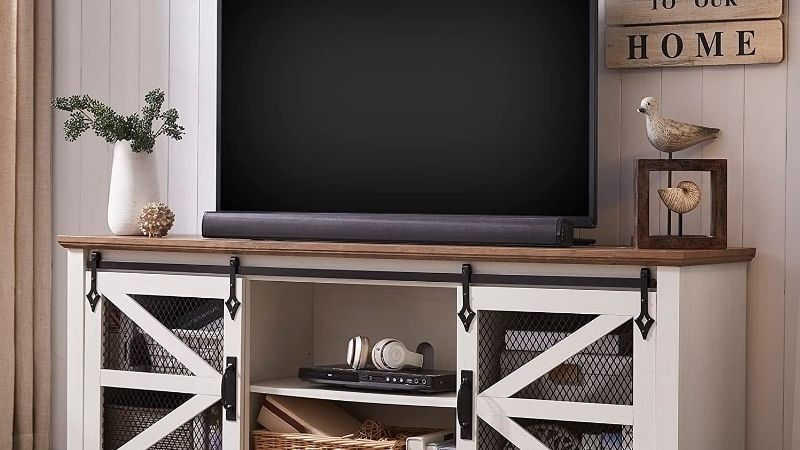
The objective is an uncomplicated rectangular cabinet with shelves, visible face framing, and a restrained two-tone finish. That puts this project in a different category from sliding-door cabinets, reclaimed-wood cladding, and fireplace surrounds. A complete TV-specific plan is the starting point; a decorative entry table is not automatically an adequate TV support.
Choose a TV-Suitable Plan Before Picking a Farmhouse Finish
Look for a media-console plan that shows its top, side panels, dividers, shelf supports, back, joinery, and cable routes. Kreg publishes an Easy-to-Build TV Stand with a structured base, top slats, internal dividers, and a back panel that includes wire openings [Kreg Tool, Easy-to-Build TV Stand, accessed October 2026]. Those documented features are more useful for a functional media cabinet than purely decorative X-bracing.
For farmhouse styling, Ana White publishes a Farmhouse Media Console plan by Patrick Hosey with a framed case, doors, a wood top, and a published cut list [Ana White, Farmhouse Media Console, accessed October 2026]. It is labeled an intermediate project. The specific material dimensions in that plan belong to its own design; do not combine random pieces from it and a different cabinet plan and assume the same structural result.
Measure the Television, Seating Position, and Available Wall
Measure the actual television pedestal or the distance between the outer edges of its feet, not only the diagonal screen size. Record the TV weight from its model documentation and leave practical margin around the feet so the screen can rest fully on a level top. Check the wall width, baseboards, nearby outlets, and the route people use to walk past the cabinet before deciding on an overall length.
Compare the height of the planned cabinet plus television stand with your seated sightline. A farmhouse top that looks balanced under a wall mirror may position a TV uncomfortably high when used in a living room. Also measure the receiver, game console, router, or soundbar you expect to store; shelf clearances should allow the device itself, cable bend, and the ventilation specified in its manual.
Define the Farmhouse Look Without Compromising the Cabinet
A painted frame under a stained natural-wood top is a recognizable farmhouse combination without requiring barn-door rollers or aged reclaimed boards. Choose straight, sound lumber or appropriate cabinet panels, simple face-frame lines, and open baskets for light storage. Use molding as surface detail, not as a replacement for dividers, braces, or the top support specified by the chosen woodworking plan.
Ana White’s Patrick Hosey plan lists standard 1×12, 1×2, 1×3, and 1×1 stock, hinges, knobs, and pocket-hole screws among its materials [Ana White, Farmhouse Media Console]. That gives a source-backed example of how ordinary lumber and trim can create the look. It is not a shopping list for every farmhouse TV stand, and a console made from different material needs its own cut and fastening schedule.
| Material or Tool | Size or Spec | Cost Tier | Substitute |
|---|---|---|---|
| Published TV-console plan | Documented top, dividers, back and assembly | Essential reference | Get precut parts for an intact approved design |
| Cabinet lumber or panels | Match the selected plan; Ana White lists 1×12 stock | Core material | Plan-specified plywood or other listed stock |
| Face-frame and trim boards | Ana White example lists 1×2, 1×3 and 1×1 | Core material | Simpler square-edge approved trim |
| Drill and joinery supplies | Match specified material thickness and fasteners | Tool-dependent | Cabinet shop assembly service |
| Sander and surface finish | Primer, cabinet paint, compatible stain and topcoat | Finish materials | Single-color finish per product directions |
| Level and wall restraints | Anchors suited to wall structure and TV setup | Safety essential | Qualified furniture and TV installer |
How to Build a Farmhouse TV Stand Step by Step
Use the selected plan as the controlling source for every length, fastener, screw position, and assembly order. The sequence below explains the woodworking decisions for a simple rectangular farmhouse media console; it is not a replacement cut list for a newly engineered cabinet. If you resize a published design, revisit the supports and span before loading it with electronics.
Step 1: Lay Out the Footprint and Mark Each Part
Clear a flat workspace, check the lumber for bowing or splits, and review the complete shopping list before making cuts. Mark each part against the final design: top, bottom, sides, internal supports, shelves, face-frame members, and back. Label the parts as you cut them. Work from the drawing rather than cutting two identical-looking pieces that serve different positions in the case.
The Ana White Farmhouse Media Console plan includes a 52 1/2-inch-long 1×12 component and a separate 57 1/2-inch-long 1×12 component in its cut list [Ana White, Farmhouse Media Console]. Those are example part lengths, not universal finished-console dimensions. Use them only if you have chosen that exact plan and are following its revisions and drawings rather than a modified layout.
Dry-lay the top in the room using tape, then compare the actual screen feet and soundbar placement with the proposed footprint. Do not trim the side clearance so tightly that a screen base overhangs. Check that the finished cabinet can be carried through a doorway and reached for anchoring and cable service once it is close to the wall.
Step 2: Assemble a Square and Supported Cabinet Base
Join the side panels, bottom, and necessary structural rails in the sequence shown by the chosen project. On a box-style media cabinet, check squareness across its corners while clamps still allow small corrections. Work on a flat floor or assembly table and avoid forcing a warped panel into place by overtightening a screw. A visibly skewed case makes doors and shelves difficult to fit later.
Kreg’s published TV-stand example calls for pocket-hole construction, internal dividers, and specified panel thicknesses [Kreg Tool, Easy-to-Build TV Stand]. Use its corresponding setup only with that plan. Pocket-hole screw length, pilot depth, and glue suitability depend on the actual boards or panels; a screw that suits a thicker rail may protrude through a thin shelf.
Treat the primary load path as the nonnegotiable part of the project. The TV and its stand load the top, which must transfer that weight through suitable dividers or rails into the base and floor. Do not cut out a middle partition merely to create one large open bay unless a qualified builder has determined how the altered top will be supported.
Step 3: Add Shelves, Face Frames, and Accessible Storage
Install the shelves where your equipment actually fits instead of centering every opening for appearance alone. Measure the tallest device, the direction its cooling air exits, and the bend radius of its cables according to the device manual. Prefer a ventilated open compartment for hot-running hardware, especially when the alternative would be a sealed decorative box.
Attach the face frame in alignment with the case, using the support and fastening method in the drawing. Straight rails, modest end overhangs, and a clean horizontal shelf line provide a farmhouse look without custom metal runners or complicated door joinery. The face frame is primarily a neat visual edge unless the specified construction clearly makes it part of the load-bearing structure.
Keep small baskets or lightweight decor on shelves intended for them. A tall stack of heavy media equipment can shift the cabinet’s center of gravity or overload an unsupported shelf. Test the drawer or basket travel before installing the back, and check that decorative trim will not block an outlet, the receiver remote, or a needed ventilation path.
Step 4: Fit the Top and Keep Solid Wood Movement in Mind
Set the top onto the completed cabinet and align its front and end overhangs while checking that it sits flat. In Ana White’s Farmhouse Media Console instructions, the top is assembled separately and then attached with even overhang at the ends and front [Ana White, Farmhouse Media Console]. This is a useful planning reference for the appearance, but the actual attachment must match the wood and joinery of your selected design.
For a solid-wood top, account for seasonal expansion and contraction across the grain. Use the attachment approach provided in the plan or specified by a competent woodworker rather than gluing the entire width rigidly to a dimensionally different case. A plywood top is assembled differently from joined solid boards; the word “farmhouse” says nothing about which connection is appropriate.
Check the top from the viewing side, inspect for sharp corners, and confirm the full footprint of the TV can fit without interference from a raised trim lip. If your television uses widely spaced feet, use their precise outermost footprint, not the width printed on a retail box. A structurally questionable top should be corrected before the finishing stage, not disguised with thicker paint.
Step 5: Paint the Base, Stain the Top, and Keep It Simple
Remove the top or mask it properly before applying separate finishes. Fill nonstructural surface blemishes with a suitable product, then sand in stages following the coating instructions. Vacuum and wipe off sanding residue before priming a painted base. A muted off-white, warm gray, or subdued green frame pairs well with a stained or clear-finished wood top without relying on artificial distressing.
Ana White’s finishing guidance calls for preparing the surface, letting fillers dry, removing sanding dust, and following the particular paint or stain system [Ana White, Farmhouse Media Console]. That sequence is more dependable than an arbitrary recommendation to wait a fixed number of hours. Drying and curing can vary with temperature, humidity, application thickness, and the specific coating, so read the labels.
Apply coats in a dust-controlled, ventilated space appropriate for the product, and store stain-soaked rags as its fire-safety directions require. Do not install a television or electronics until coatings are suitably cured for handling and the cabinet can be moved without damaging the finish. Use protective pads beneath components when appropriate, but never block device vents with fabric or decorative shelf liners.
Step 6: Add Cord Access, Anchor the Cabinet, and Place the TV
Before mounting the back, mark where cords need to enter and exit. Kreg’s Easy-to-Build TV Stand includes a back panel with holes intended for wiring [Kreg Tool, Easy-to-Build TV Stand]. Reproduce openings only where your own assembly drawing permits them and where they will not remove important bracing. Protect cable runs from rough cut edges and moving storage pieces.
Set the finished cabinet level against the intended wall and inspect for rocking. Attach appropriate anti-tip restraint hardware to suitable wall structure, following the restraint manufacturer’s directions. Secure the television separately as needed. The U.S. Consumer Product Safety Commission specifically recommends anchoring TVs and furniture and using furniture designed to support a TV [CPSC, 2026]. This advice also matters in homes with visiting children.
Place the screen only when its base fits fully, its weight is within a documented or professionally assessed support capacity, and its cords cannot snag. Keep heavy objects low and avoid storing toys or remotes where they invite climbing. CPSC’s February 2026 guidance also advises pushing a TV back on a sturdy, low base when anchoring is not possible, but that fallback is not equivalent to a properly anchored installation [CPSC, release 26-259].
Frequently Asked Questions
After the main build, these questions help decide how to adjust the project for a modest home workshop, existing furniture, and a household’s storage habits. Keep every change consistent with the actual woodworking plan and the television manufacturer’s installation instructions.
Is an Open-Shelf Farmhouse TV Stand Easier Than a Door Cabinet?
Usually, a rectangular open-shelf arrangement avoids hinge alignment, door reveals, and specialized sliding hardware. It still requires accurate cutting, secure joints, stable supports, and a properly attached back or bracing where the plan calls for it. Simpler appearance should not be confused with an automatically high TV load capacity.
Open compartments work well when equipment needs access for cords and ventilation. The trade-off is visible wiring and dust. If you need concealed storage, a separate low basket or a plan with standard hinged doors may be easier to maintain than altering an already completed frame. Avoid additions that shift heavy weight toward the front edge.
Can I Refresh an Existing TV Console Instead of Building One?
Yes, if the existing piece is already a sound, TV-suitable cabinet with an appropriate top, a defensible capacity, and suitable anti-tip provisions. A finish update can include preparing the surface, repainting the main case, staining or replacing permitted decorative trim, and adding hardware that does not interfere with doors or vents.
Do not assume an ordinary hall table can safely carry a TV just because it looks like the furniture in a farmhouse photograph. Check the original product’s supported use and the TV base. If the piece is unstable, damaged, or missing key support members, cosmetic work is not a structural fix and a new TV-rated console or a properly installed wall mount is preferable.
What Finish Holds Up Best Around Everyday Media Equipment?
A finish compatible with the cabinet material and intended interior use matters more than an invented durability score. Use the coating maker’s surface-preparation directions, primer requirements, recoat interval, and curing time. A wipeable cabinet paint on the case and an appropriate protective finish on the top can be practical when remotes and controllers are moved frequently.
Test the selected stain and paint on scrap from the actual boards because color changes with wood species and sanding. Place devices on a fully cured surface and use nonabrasive cleaning products approved for that finish. If small chips develop later, repair them following the product’s touch-up instructions instead of sanding around installed electronic equipment.
Can I Resize a Farmhouse TV Stand for a Larger Screen?
Possibly, but changing the overall span or depth affects the entire cabinet, including the top’s support, internal dividers, joint locations, and any back bracing. Ana White notes that modifying a project size requires reviewing the full cut list and how one dimension affects other parts [Ana White, Farmhouse Media Console, site FAQ]. A longer board on its own does not establish a higher weight rating.
Choose the actual TV before resizing the cabinet, check its total weight and supporting feet, and redraw the full plan accordingly. Have major structural changes reviewed by a competent cabinet builder if there is no reliable load guidance. For a much larger screen, a manufacturer-specified wall mount paired with lower storage can be a safer choice than an improvised extra-wide tabletop.
Final Thoughts
A diy tv stand farmhouse project is most successful when the media cabinet comes first and the rustic finish comes second. Select an actual TV-console plan, preserve its supports, provide practical shelves and cable access, and use a calm painted-base and wood-top combination. Confirm TV fit and anchoring before bringing the screen into the finished room.