Key takeaways
- Entryway wall (main recommendation): Mount the bottom tier 10 to 14 inches above the finished floor. This leaves 8-12 inches of open floor underneath for easy sweeping and prevents the lowest shoes from touching dust and mop water. The top of a 3-tier rack will then sit at 34-38 inches high, which is just below most entryway console tables (30-32 inches high) and will not interfere with light switches, which are typically at 44-48 inches.
- Inside a closet on a side wall: Mount the bottom tier 6 to 8 inches above the floor if space is tight, and align the top tier at least 4 inches below any hanging clothes (usually 66 inches for long hang). This prevents shoes from brushing coats.
- On or behind a closet door: For over-door racks, the bottom hook sits about 4-6 inches below the top of the door. An 80-inch interior door can hold a 60-inch tall rack with 5-6 tiers and still leave 8-10 inches of clearance at the bottom so the door can open over carpet or a threshold.
- Above a baseboard heater or vent: Keep at least 6 inches of clearance above heaters and do not mount directly over a floor HVAC vent; heat will warp shoe glue and dry leather.
What's inside
- Which Wall Mounted Shoe Rack to Choose by Situation
- Pairs Per Tier: How Width and Depth Translate to Real Capacity
- Mounting Height: Where to Place It for Entryways and Closets
- Stud vs. Drywall: What Actually Holds Weight
- Entryway vs. Closet Door: Which Location Saves More Space
- Material and Construction: What Lasts in Daily Use
- Assembly, Moving and Durability Realities
- Final Buying Checklist Before You Drill
The best wall mounted shoe rack for saving floor space is a 2-tier or 3-tier metal frame mounted at 8 to 14 inches off the floor for entryways, or a slim over-door style rack if you cannot drill into studs; choose pairs-per-tier based on your household size, not just rack length.
- Which Wall Mounted Shoe Rack to Choose by Situation
- Pairs Per Tier: How Width and Depth Translate to Real Capacity
- Mounting Height: Where to Place It for Entryways and Closets
- Stud vs. Drywall: What Actually Holds Weight
- Entryway vs. Closet Door: Which Location Saves More Space
- Material and Construction: What Lasts in Daily Use
- Assembly, Moving and Durability Realities
- Final Buying Checklist Before You Drill
Which Wall Mounted Shoe Rack to Choose by Situation
Buying a wall mounted shoe rack is a decision about where you will mount it and how much weight your wall can hold, more than about looks. Use your situation to narrow the type first:

2 Pack Wall Mounted Shoe Rack, 3 Tier Hanging Shoe Rack Holds 24 Pairs, 17"-30"Adjustable Heavy Duty Shoe Organizer Holder with 4 Storage Hooks, Space Saving for Closet Entryway, Black, Patent Pending
Included for 'Best Wall Mounted Shoe Racks to Save Floor Space' because the listing specifies 3 Tier Hanging Shoe Rack Holds 24 Pairs and Space Saving for Closet Entryway, details this guide uses to compare options.
View on Amazon
UVIAHOMI 20-30 Pairs Over the Door Shoe Organizer, 10-Tier Door Shoes Rack
Included for 'Best Wall Mounted Shoe Racks to Save Floor Space' because the listing specifies 10-Tier Door Shoes Rack, details this guide uses to compare options.
View on Amazon
SWTYMIKI Over the Door Shoe Organizer - Adjustable 4 Tier Hanging Shoe Rack Organizer, Metal Heavy Duty Behind Door Storage or Wall Mount Shoes Shelf for Flats, Heels, Sneakers, Boots Black
Included for 'Best Wall Mounted Shoe Racks to Save Floor Space' because the listing specifies Adjustable 4 Tier Hanging Shoe Rack Organizer and Heels, details this guide uses to compare options.
View on Amazon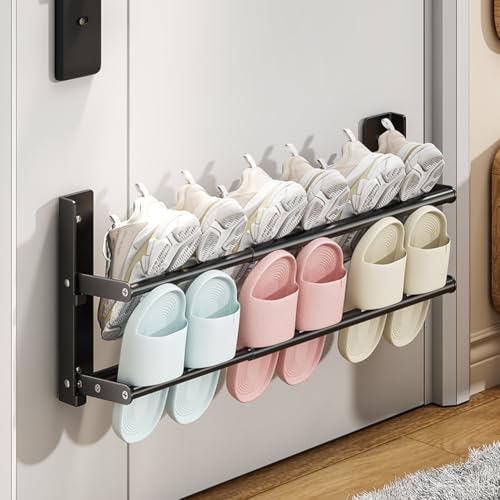
DongMaple Shoe Rack Expandable 14.6"-26.4",2-Tier Metal Hanging Shoe Organizer Holds 6 Pairs of Shoes,Wall-Mounted Shoe Rack, Foldable Shoe Shelf for Entryway Space-Saving Shoe Holder for Door, Black
Included for 'Best Wall Mounted Shoe Racks to Save Floor Space' because the listing specifies Wall-Mounted Shoe Rack and Black, details this guide uses to compare options.
View on Amazon| Situation | Best Type of Wall Mounted Shoe Rack | Why It Works | Installation |
|---|---|---|---|
| Small apartment entryway (3-4 ft wide) | 2-tier floating wire or steel rack, 24-32 inches wide | Holds 4-6 pairs without blocking door swing; leaves floor clear for vacuuming | Must hit at least one stud; use second anchor as heavy-duty toggle if needed |
| Renter who cannot drill into studs | Over-closet-door rack or adhesive-free leaning wall rack | No wall damage; still saves floor space | Hooks over standard 1-3/8″ interior door; no anchors needed |
| Large family (5+ people) | 3-tier or 4-tier vertical wall rack, 36-48 inches wide | Holds 9-12 pairs in same footprint as a floor rack | Requires 2 studs; 50-75 lb total load capacity when properly anchored |
| Narrow hallway or closet interior | Single-tier floating shelf rack, 6-8 inches deep | Keeps 15+ inches of walkway clearance in a 36-inch hallway | Single stud is enough; 15-20 lb per tier |
| Kids, pets, or heavy boots | Solid steel frame with closed ends and mesh bottom | Prevents shoes from being knocked off; supports 25-35 lb per tier | Stud mounting mandatory; drywall anchors will fail over time |
Pairs Per Tier: How Width and Depth Translate to Real Capacity
Product listings often say “holds 12 pairs” without explaining that capacity depends entirely on shoe size and how tightly you pack them. For wall mounted racks, usable width is 2 to 3 inches less than total width due to side brackets.
Use these real numbers to estimate:
| Rack Width (Total) | Usable Width | Pairs Per Tier (Men’s 10-11) | Pairs Per Tier (Women’s 7-8) | Depth Needed |
|---|---|---|---|---|
| 18 inches | 15-16 inches | 1 pair | 2 pairs | 6 inches for flats, 10 inches for sneakers |
| 24 inches | 21-22 inches | 2 pairs | 2-3 pairs | 8-10 inches |
| 32 inches | 29-30 inches | 3 pairs | 3-4 pairs | 10-12 inches |
| 42-48 inches | 39-45 inches | 4-5 pairs | 5-6 pairs | 10-12 inches |
Depth matters more than width for boots and chunky sneakers. A flat sandal needs only 6 inches of depth, but a men’s running shoe needs 12 inches toe-to-heel and a winter boot needs 13-15 inches with the shaft. If your hallway is only 36 inches wide, a 12-inch deep rack mounted on the wall still leaves 24 inches of clear passage, which meets the minimum comfortable walkway clearance of 22-24 inches. A floor rack of the same depth plus its frame would leave only 20-21 inches.
When to Add Another Tier Instead of Going Wider
Add a tier if your wall width is limited but you have vertical space. Each tier adds 6 to 7 inches of height for flat shoes and 8 to 10 inches for high-tops or ankle boots. A 3-tier rack with 8 inches between tiers will be about 24-28 inches tall overall, which fits neatly under a standard 36-inch coat hook height and above baseboards. Go wider instead if anyone in the household wears size 11+ or you store boots, because stacking boots tightly on narrow tiers makes them fall off.
Mounting Height: Where to Place It for Entryways and Closets
Mounting height determines whether you can slide shoes in with one hand and whether the bottom tier stays clean.
- Entryway wall (main recommendation): Mount the bottom tier 10 to 14 inches above the finished floor. This leaves 8-12 inches of open floor underneath for easy sweeping and prevents the lowest shoes from touching dust and mop water. The top of a 3-tier rack will then sit at 34-38 inches high, which is just below most entryway console tables (30-32 inches high) and will not interfere with light switches, which are typically at 44-48 inches.
- Inside a closet on a side wall: Mount the bottom tier 6 to 8 inches above the floor if space is tight, and align the top tier at least 4 inches below any hanging clothes (usually 66 inches for long hang). This prevents shoes from brushing coats.
- On or behind a closet door: For over-door racks, the bottom hook sits about 4-6 inches below the top of the door. An 80-inch interior door can hold a 60-inch tall rack with 5-6 tiers and still leave 8-10 inches of clearance at the bottom so the door can open over carpet or a threshold.
- Above a baseboard heater or vent: Keep at least 6 inches of clearance above heaters and do not mount directly over a floor HVAC vent; heat will warp shoe glue and dry leather.
If you have a bench or seating in the entryway, maintain 18 inches of horizontal clearance between the edge of the bench and the front of the shoe rack so you can sit and reach shoes without twisting. In a 10×12 ft entry room or mudroom, a 32-inch wide wall mounted rack uses about 2.6 sq ft of wall area and zero floor area, versus a floor rack that consumes 3-4 sq ft of usable floor space you need for standing and opening the door.
Stud vs. Drywall: What Actually Holds Weight
This is where most buying mistakes happen. A pair of sneakers weighs 2-3 lb, but a fully loaded 3-tier rack with 6 pairs can weigh 25-40 lb total. Boots push that to 45-60 lb. Drywall alone cannot hold that long-term.
How to Know What You Have
Studs in most US homes are spaced 16 inches on center, sometimes 24 inches in newer construction. Use a stud finder or tap and check for a solid sound versus a hollow sound. Drywall is 1/2 inch thick on walls, 5/8 inch on some ceilings. Plaster walls are harder and may require masonry-type anchors.
Installation Trade-offs
| Method | Weight Limit Per Anchor Point | When to Use | Downside |
|---|---|---|---|
| Wood stud with #10 x 2.5″ wood screw | 50-75 lb in shear per screw | Any rack holding 4+ pairs or boots | Must align rack holes with stud locations |
| Heavy-duty toggle bolt (1/4″ in 1/2″ drywall) | 30-40 lb in shear per bolt | Light 1-2 tier racks for 2-3 pairs of flats/sneakers only | Requires 1/2″ hole; cannot be reused if you move rack |
| Self-drilling drywall anchor (plastic or zinc) | 15-25 lb per anchor | Temporary or very light single-tier shelf | Pulls out over time with daily loading/unloading; not for boots |
| Over-door hooks (no drilling) | 20-30 lb total for whole rack | Renters, metal hollow-core doors | Door may not close fully if rack is too deep; can rattle |
For a secure install, aim to hit at least one stud with the top mounting rail, which bears most of the pulling force. If your rack is 32 inches wide and studs are 16 inches apart, you can usually hit two studs. If it is 24 inches wide, you will hit one stud and should use a toggle bolt for the second side. Never mount a 3-tier or longer rack using only plastic drywall anchors, even if the package includes them. The anchors will hold initially but will loosen within months from the repeated downward pull of removing shoes.
For concrete or brick entry walls, use 3/16″ masonry screws or sleeve anchors rated for 75+ lb; you will need a hammer drill. In that case weight is not an issue, but leveling is, so use a 24-inch level across the mounting bracket before drilling.
Entryway vs. Closet Door: Which Location Saves More Space
Entryway wall mounting is better for daily rotation shoes (3-6 pairs). It keeps shoes visible, ventilated, and off the floor where they create a tripping hazard near the door swing. A floor shoe tray in a 36-inch wide entry reduces the clear opening to 28-30 inches when the door is open 90 degrees. A wall rack keeps the full 36 inches clear.
Closet door mounting is better for seasonal or less-used shoes and for households that want shoes hidden. An over-door rack on a standard 24-inch wide closet door can hold 6-10 pairs without using any wall or floor space inside the closet. The trade-off is depth: most over-door racks are 5-7 inches deep to allow the door to close, so they only fit flats, sandals, and low sneakers sideways. Bulkier shoes will prevent the door from closing fully and may damage the door frame.
If you use a wall mounted rack inside the closet itself, mount it on the side wall perpendicular to the hanging rod, not on the back wall behind clothes. Clothes need 24 inches of depth to hang; a rack on the back wall forces you to push clothes aside to reach shoes.
Material and Construction: What Lasts in Daily Use
| Material | Typical Price Range | Weight Limit Per Tier | Pros | Cons and What Wears First |
|---|---|---|---|---|
| Powder-coated steel / metal wire | Usually $25–$70 for 2-3 tiers | 25-35 lb | Strongest for boots; ventilated so shoes dry faster; easy to wipe clean | Coating can chip at weld points if shoes drag; may squeak if screws loosen |
| Solid wood (bamboo, rubberwood) | Usually $60–$150 | 20-30 lb | Warm look; solid shelves hold heels without tipping | Heavier to mount (rack itself 8-12 lb); needs studs; can stain from wet shoes |
| Engineered wood (MDF with veneer/laminate) | Usually $40–$90 | 15-20 lb | Lowest cost for a wide shelf look | Swells if exposed to wet shoes repeatedly; laminate peels at edges first; not for entryways without a mat |
| Plastic composite with metal frame | Usually $30–$60 | 15-20 lb | Lightest; good for renters and over-door types | Flexes under heavy load; tiers sag 1/4″ over time with boots |
For the longest life in an entryway where shoes may be wet, choose powder-coated steel with a mesh or rail bottom rather than a solid engineered wood shelf. If you prefer wood for a built-in look, choose bamboo or solid rubberwood and add a thin metal or plastic drip tray on the bottom tier. Foam or fabric elements are not needed on shoe racks; avoid upholstered wall racks, which absorb odor and moisture.
Assembly, Moving and Durability Realities
Most wall mounted shoe racks ship flat in a box weighing 6-14 lb for metal models and 12-20 lb for solid wood. Carton size is typically 26x14x4 inches for a 32-inch rack, so it fits through any standard 30-inch doorway and up stairs easily, unlike large shoe cabinets.
Assembly is usually 4-8 screws and two wall brackets, taking 15-30 minutes with a drill and level. The most common error is mounting the bracket out of level by 1/8 inch, which makes shoes slide to one side on every tier. Check level on the bracket itself, not on the tiers.
What wears first is not the rack but the anchors and the wall paint behind the shoes. Shoes scuff the wall as you slide them in; apply a clear wall protector sheet or paint the area with washable semi-gloss paint. Tighten mounting screws after the first month of use; daily loading loosens them slightly. For metal racks, check the powder coating at the front rail where shoe soles make contact; a small chip can lead to surface rust if wet shoes sit on it. Touch up with appliance enamel if needed.
If you move, a wall mounted rack leaves 2-4 small holes per bracket. Filled with spackle and touched up, they are invisible. An over-door rack leaves no holes at all, which is why it remains the only truly damage-free option for renters.
Final Buying Checklist Before You Drill
- Measure your shoes toe-to-heel and count how many pairs you need daily access to; match to usable width, not total width.
- Find studs and mark them; choose a rack whose mounting holes can align with at least one stud.
- Decide height: 10-14 inches off the floor for entryways, 6-8 inches inside a closet.
- Confirm door and walkway clearance: maintain 24 inches of passage and 18 inches from any bench.
- Pick material for moisture: steel or solid wood for wet entryways, engineered wood only for dry closets.