To learn how to build a tv stand with sliding doors, start with a square plywood cabinet, choose a track system that matches your door thickness, and cut the door panels only after the opening is assembled. This guide shows a practical floor-standing approach. The sample dimensions are planning examples, not a tested furniture load rating.
As an Amazon Associate we earn from qualifying purchases.
By KK Home Furnishings Editorial Team
Plan and Measure Your Sliding-Door TV Stand
A good build begins with the television’s actual base, the devices you need to store, and a sliding-track kit selected before cutting the doors. An illustrative cabinet measures 60 inches wide, 18 inches deep, and 24 inches high, including its base. Adapt every dimension to your room, your hardware manual, and the load the finished structure must support.
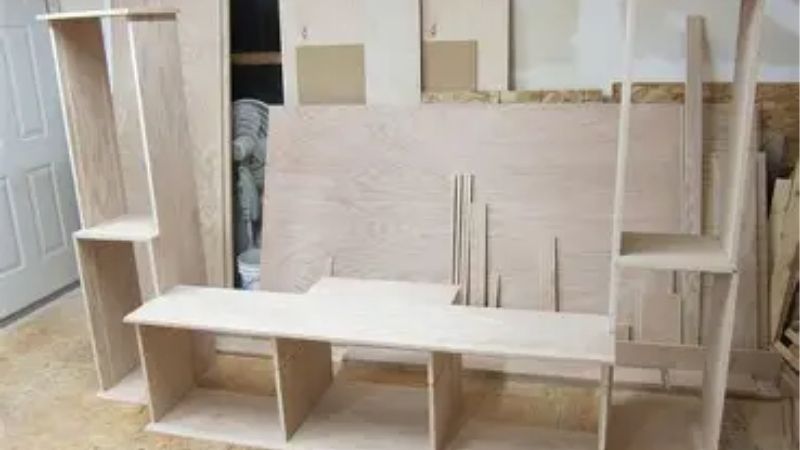
Check the TV Footprint and Define the Cabinet’s Job
Measure the television’s stand feet from their outermost edges, not the screen diagonal. Record the depth of the base, total television weight from its manual, and the available floor area. If the TV uses spaced feet, check both contact points against the uninterrupted, supported top surface. The cabinet should not be judged by screen size alone.
Decide whether your cabinet will carry the TV or sit below a separately wall-mounted screen. A DIY cabinet has no manufacturer-certified load capacity merely because it uses thick plywood. If you cannot establish a safe load path through the top, divider, sides, joints, and base, use an appropriate rated support arrangement instead of guessing.
Select Cabinet Materials and Plan Structural Support
Three-quarter-inch cabinet-grade plywood is a practical starting material for a rigid box, with a thinner back panel helping resist racking when properly attached. Kreg’s published cabinet projects use similar plywood construction and pocket-hole joinery [Kreg Tool, accessed October 2026]. Actual plywood thickness may be below its nominal label, so measure the sheet.
For the sample, the 60-by-18-inch top and bottom enclose two 19.5-inch-high side panels; a 3-inch plinth brings the nominal overall height to 24 inches. A central vertical divider supports the long top but must be recessed behind the sliding-door path. These are design examples, not a cut plan certified for a particular television.
Choose a Track That Fits the Sliding Panels
Door thickness decides the hardware. Rockler item 84210 is a hardwood track and upper guide intended for 1/4-inch sliding cabinet doors; its listed track length is 5 feet [Rockler, accessed October 2026]. That is a real example of a compatible system, not permission to use the same groove dimensions with heavier 3/4-inch doors.
Read the exact track instructions before finalizing door height, depth, overlap, and removal clearance. Confirm whether the chosen system has two bypass lanes, door stops, and anti-lift retention. The running hardware, not a generic fraction-of-an-inch rule, determines final panel dimensions. Choose a different rated system if you want thick barn-style doors.
| Material or Tool | Size or Spec | Cost Tier | Substitute |
|---|---|---|---|
| Top and bottom | Two 60-by-18-inch panels; nominal 3/4-inch plywood, sample only | Mid | Cabinet-grade veneer plywood |
| Outer sides | Two 19.5-by-18-inch panels; nominal 3/4-inch plywood | Mid | Precut panels of measured actual thickness |
| Center divider | One 19.5-inch-high piece; depth adjusted to clear track lanes | Low | Additional framing placed behind the door path |
| Back and plinth | Sample 1/4-inch back; 3-inch plinth; exact fitting dimensions on site | Low | Stiffer screwed back and separate structural base |
| Sliding doors | Two 1/4-inch panels cut to measured track-system clearance | Low | Compatible veneered or stable hardwood sheet |
| Track and tools | Matched upper/lower guide system, saw guide, drill, clamps, square | Mid | Manufacturer-approved cabinet bypass hardware |
How to Build a TV Stand With Sliding Doors Step by Step
Build the box before sizing the moving panels. That sequence is the key difference between a cabinet with sliding doors and a fixed-front TV stand: track position and the as-built opening determine whether both doors glide, overlap, and lift out when needed. Work on a flat surface, protect your eyes and hearing, and follow the instructions supplied with your saw and drill.
Step 1: Cut and Label the Plywood Panels
Have the plywood cut with a track saw, a circular saw and straightedge, or a panel saw capable of repeatable square cuts. Label the top, bottom, two sides, divider, and back on painter’s tape. Use the sample schedule only as a sketch for planning. Verify blade kerf, sheet thickness, actual room measurements, and the grain direction before committing to final cuts.
Dry-stack each side between the top and bottom and compare the two diagonals of the assembly footprint. If the panels do not sit flush, correct the cuts now rather than relying on screws to pull a crooked joint square. Apply edge banding to exposed plywood edges before doors obscure access, and leave the cabinet opening free of trim until the tracks have been selected.
For a beginner, ask a lumberyard to make the large straight panel cuts and reserve smaller fitting cuts for home. Full sheets are unwieldy, particularly indoors. Support the entire sheet while cutting, avoid trapping an offcut against the blade, and do not lift a finished 60-inch assembly alone if it is too heavy to control safely.
Step 2: Assemble a Square Top, Bottom, and Side Frame
Clamp one side to the bottom so the front edges align and the joint is square. Drill pilot holes or pocket holes appropriate to the actual sheet thickness, then assemble with cabinet-suitable glue and screws. Kreg’s plywood cabinet plans demonstrate 3/4-inch jig settings and 1-1/4-inch pocket screws for particular projects, but the instructions for your jig and fasteners take precedence.
Attach the opposite side, then secure the top while the work is supported on a flat bench. Check for twist before the glue cures. A long, unsupported top can deflect even when a cabinet looks rigid, so do not assume that its apparent thickness proves it can safely support a TV. A properly connected center divider and back are part of the structural layout, not optional decoration.
Keep screw heads away from the planned track mounting zones. On plywood edges, pilot drilling reduces the risk of splitting or delamination; countersink only when the fastener design calls for it. Remove squeeze-out before it hardens, because hardened glue can interfere with the track seating flat later. Do not overdrive screws into sheet edges.
Step 3: Add the Divider, Back Panel, and Base
Position the divider under the top where it provides a direct supporting path to the bottom panel and plinth. Set its front edge back far enough to clear both bypass door lanes and any pull handles. Confirm that adjustment against the selected hardware drawing; a center divider that projects into a door lane will prevent the panels from crossing the opening.
Dry-fit the back, check the case diagonals again, and secure the panel according to the intended joinery. A full back adds resistance to side-to-side racking; provide cable access without removing the bracing needed for stability. Round or edge-protect cable openings, and keep electronics ventilation spaces consistent with each device’s manual rather than copying an arbitrary hole pattern.
Build the sample 3-inch plinth as a continuous, firmly joined support beneath the cabinet, not as four loose spacers. Fasten it so the load travels into a level floor without rocking. Adjustable feet may help with an uneven surface if rated and installed correctly. Leave rear access for anchor hardware before pushing the cabinet into its final position.
Step 4: Fit the Upper and Lower Sliding-Door Tracks
Measure the finished clear width at the front of the case, then cut each track to the length allowed by its manufacturer’s installation instructions. Fix the lower running track and upper guide in parallel so the door panels remain captured without binding. With a two-lane bypass system, each door must occupy its specified lane from end to end.
Use a straightedge and temporary offcut of the actual door material to check the installation before drilling every mounting hole. If the upper track is shifted relative to the lower one, even a correctly cut panel may lean or jump its guide. Do not replace a supplied fastener with an oversized screw that could protrude into the sliding path or crack the hardwood guide.
Make sure there is enough vertical play for fitting and removal but not so much that an installed door can disengage during ordinary use. Some systems retain the panels using specific guides or stops; install all specified pieces. A track that is merely screwed in place is not necessarily a complete, secure door system. Record the fitting dimensions on your workshop notes.
Step 5: Cut, Finish, and Hang Both Door Panels
Measure the clear opening again after the tracks are fully mounted. Use the kit’s published procedure to determine each panel’s final height, width, and overlap. In this example, two thin plywood panels share the opening and slide past each other, but their cut dimensions are deliberately not fixed in advance. Cutting both doors from a generic TV-stand plan is a common source of wasted wood.
Sand the panel faces and edges and apply a finish suited to the wood and the room. A low-profile finger pull or shallow routed recess is less likely to collide with the opposite door than a protruding knob. Test any decorative battens or trim off the cabinet first; the added thickness may prevent the panels from fitting the specified 1/4-inch track.
Following the hardware instructions, insert the rear panel and then the front panel, or reverse that order if your track system specifies otherwise. Slide each across its full travel, check the overlap at the center, and confirm that stops or retainers work. If a door rubs, inspect the alignment and panel thickness before sanding away material at random.
Step 6: Manage Cables, Secure the Unit, and Test It
Route power and signal cables through the planned rear access opening without pinching them behind the moving doors. Leave the ventilation required by consoles, receivers, streaming equipment, and other components. Avoid cutting into structural members after assembly, and keep power strips accessible rather than burying them in an unventilated closed space.
Before placing a television on the cabinet, verify that the finished top and its supports are suitable for that exact load. If you do not have a defensible load assessment, do not treat the cabinet as a rated TV mount. The U.S. Consumer Product Safety Commission advises securing televisions and furniture against tip-overs through its Anchor It campaign [CPSC, accessed October 2026].
Use anchor devices and wall fasteners rated and appropriate for your wall construction, securing the cabinet and television as required by the anchoring instructions. Finally, open both panels several times with devices inside, watching for cable snags, loose stops, rocking, or a changing door gap. Address any movement before using the unit as everyday furniture.
Frequently Asked Questions
Once the cabinet is square and the doors are running smoothly, the remaining questions tend to involve customization and everyday access. The answers below focus on choices that are easy to miss while shopping for materials, not on repeating the assembly sequence.
Can I Use Solid Wood Instead of Thin Plywood for the Doors?
Yes, but only with hardware rated for the actual weight, thickness, and movement of those doors. The Rockler hardwood track example discussed above is specifically listed for 1/4-inch panels. A thick solid-wood door belongs on a different compatible system, and should never be forced into a track intended for thin sheet goods.
Solid wood expands and contracts across its grain as indoor humidity changes. A frame-and-panel design can accommodate that movement better than a broad glued-up slab in many conditions. For a first build, stable cabinet-grade plywood usually makes alignment easier. If choosing solid timber, obtain a joinery and hardware plan specific to that construction.
Will Remote Controls Work Through Closed Wooden Doors?
Not reliably for equipment that receives infrared commands through a front sensor. An opaque door blocks the line of sight those signals normally require. Before choosing a completely closed front, identify whether each device uses infrared, Bluetooth, radio frequency, network control, or a mixed system; do not assume all remotes behave alike.
A manufacturer-supported infrared repeater can be an option for compatible receivers, while some connected devices respond without a direct front-facing path. Check the device’s documentation and place any sensor where the doors will not strike it. An open side bay can also be useful when ventilation and remote access matter more than concealed storage.
Can I Add Soft-Close Hardware After the Cabinet Is Built?
Sometimes, but it depends on whether the existing track supports a compatible accessory and has the required travel space. Many soft-close systems are sold as matched running gear rather than universal add-ons. Check the manufacturer’s part number, minimum door weight, adjustment range, and installation drawing before promising a retrofit.
If soft closing is important, it is usually easier to specify it when selecting the original bypass system. A later conversion may require changing the upper guide, panel height, or track positioning. A light sliding plywood door may also fall below the operating weight of hardware intended for much heavier door panels.
What If the Floor or Wall Behind the Stand Is Uneven?
Start by leveling the cabinet’s support base on the actual floor. Do not compensate for a sloping surface by making the upper and lower door tracks nonparallel. A shim or manufacturer-rated leveling foot can correct a small support difference, but the final plinth must remain stable and securely connected to the case.
A bowed wall also changes the space available for rear cables and anchors. Use fastening methods appropriate for the wall material and avoid pulling a square cabinet out of shape to make it sit flush. If the cabinet wobbles after leveling, revisit the base and fastening arrangement instead of tightening the sliding doors to conceal the problem.
Final Thoughts
The most reliable approach to how to build a tv stand with sliding doors is to make a square, supported cabinet first, then size thin doors to the exact bypass track you selected. Keep the example dimensions flexible, do not invent a TV load rating, and complete the anchoring and cable checks before putting the finished stand into service.
More from Amazon
Programs that pair well with the guide above. Offers and eligibility are set by Amazon and may change.
Collect the home and kitchen items you want in one registry that guests can shop from.
Create a wedding registrySet up recurring deliveries of everyday items on eligible products. Terms and savings are set by Amazon.
Explore Subscribe & SaveFree shipping on eligible items, Prime Video and more. Eligible new members can start with a free trial.
Start a Prime free trialAudiobooks and podcasts to listen to on the go. Eligible new members can start with a free trial.
Try Audible freeAs an Amazon Associate we earn from qualifying purchases.