Key takeaways
- Build the cabinet first, fit its matching electric firebox at the stage shown in your model manual, then secure the furniture and test the controls. That is the practical answer to how to assemble tv stand with fireplace. The exact…
Build the cabinet first, fit its matching electric firebox at the stage shown in your model manual, then secure the furniture and test the controls. That is the practical answer to how to assemble tv stand with fireplace. The exact panels, brackets, screw sizes, and insert direction vary by model, so keep its instructions beside you throughout.
As an Amazon Associate we earn from qualifying purchases.
By KK Home Furnishings Editorial Team
Plan and Measure Your Fireplace TV Stand Assembly
Before opening every hardware bag, identify the full model number on the carton and match it to the instruction booklet. For example, Walker Edison Arundo WEARU22704 uses an insert installed from the cabinet back and secured with two L-shaped brackets, whereas Ameriwood Home 1822837COM has its own panel sequence and insert installation. These examples explain common patterns; they are not interchangeable assembly directions [Walker Edison, 2024; Ameriwood Home, 1822837COM].
Confirm the Cabinet, Firebox and Manual Match
Check that the carton includes the intended electric fireplace insert, its mounting brackets or supplied fasteners, and every furniture panel listed in the parts diagram. The Walker Edison Arundo hardware list identifies a specific RV18V80L-MT2 fireplace insert; Ameriwood Home 1822837COM identifies an FA23V60L-C8 unit. Neither name means an unrelated insert of similar width is approved for that cabinet [Walker Edison, 2024; Ameriwood Home, 1822837COM].
Keep the operating manual for the insert separate from the cabinet instructions. The furniture booklet tells you how the panels join and when to mount the firebox; the heater booklet governs the electrical connection, air openings, operating rules, and fault indications. Request the correct documentation from the manufacturer if either booklet is missing rather than using a generic video showing different bracket holes.
Set Up a Protected Workspace and Sort Hardware
Unpack beside the installation location if floor space allows, and cover the floor with a clean blanket or the carton liner to protect finished panels. Count dowels, cam bolts, cam locks, shelves, feet, brackets, screws, and optional doors against the exact hardware diagram. Ameriwood Home 1822837COM lists a flathead screwdriver, a number-two Phillips screwdriver, and a hammer; its manual specifies two people and an estimated one-hour assembly for that model [Ameriwood Home, 1822837COM].
Arrange panels with letter or number labels visible and keep similar screws separated by their printed part code. Do not force a bolt that stops short or use a longer spare screw merely because it fits the thread: an incorrect fastener can split engineered-wood panels or enter the firebox housing. Walker Edison warns that careless power-tool use can strip hardware or damage parts and may affect its product warranty [Walker Edison, 2024].
Check the Finished Location Before Building
Choose a level, dry indoor surface near a suitable wall receptacle, and make sure the assembled cabinet will not obstruct a doorway, baseboard heater, or ventilation route. Verify the exact stand dimensions, television-size rating, shelf loads, and clearance instructions in its manual before moving heavy boxes into place. A screen that fits the width may still exceed the stand’s published weight limit.
Plan the furniture anchoring points and cable path now so the back remains accessible during installation. The US Consumer Product Safety Commission recommends securing TVs and furniture against tip-over and following the maker’s mounting directions [CPSC, 2025]. Keep the fireplace unplugged during the mechanical build and do not position the cabinet where the cord would be trapped beneath a leg or against an intended heater air outlet.
| Material or Tool | Size or Spec | Cost Tier | Substitute |
|---|---|---|---|
| Cabinet and firebox manuals | Exact model and revision | Included or manufacturer download | Request official replacement instructions |
| Phillips screwdriver | Number-two for Ameriwood 1822837COM | Basic household tool | Correct hand driver for your fasteners |
| Flathead screwdriver | Listed by Ameriwood 1822837COM | Basic household tool | Matching manufacturer-recommended driver |
| Hammer and protected work pad | Use only where manual calls for tapping | Basic household supplies | Manufacturer-approved soft mallet if appropriate |
| Insert brackets and screws | Supplied for the matched firebox | Included with kit | Replacement from manufacturer, not a random screw |
| Anti-tip hardware | Specified anchor and wall fixing | Included or separately sourced | Wall-appropriate kit approved for installation |
How to Assemble a TV Stand With Fireplace Step by Step
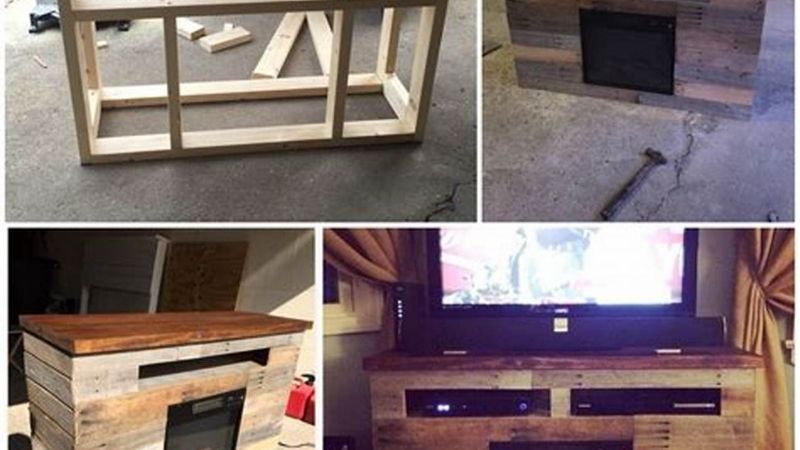
Follow the assembly sequence printed for your cabinet, not the order in a different video. The six stages below provide a way to recognize what each part is meant to accomplish. A real Walker Edison Arundo or Ameriwood Home installation may divide the work into many more numbered diagrams. Never shorten that published sequence if it requires turning the frame, checking alignment, or fitting a specific safety bracket.
Step 1: Install Dowels, Cam Bolts and the Base Frame
Lay out the bottom panel and vertical dividers in the orientation shown by the diagram. If your kit uses wooden dowels, put them only in the marked holes, and use glue only where the supplied manual calls for it. Fit cam bolts into their listed panels and turn them gently until seated. Keep the outer finished surfaces away from hardware on the floor. These details matter because a misplaced fastener can prevent the cabinet from aligning later.
Join the base, apron pieces, feet, or support rails in the order given for that model. Walker Edison Arundo WEARU22704 attaches middle feet and divider panels to its base with specified bolts before adding the rest of the vertical frame [Walker Edison, 2024]. Ameriwood Home 1822837COM initially leaves certain base bolts loose to permit alignment, then tells the user when to tighten them [Ameriwood Home, 1822837COM]. Follow that timing rather than tightening every connection immediately.
Step 2: Join the Uprights, Rails and Top Panel
Guide the side panels, internal dividers, and front framing pieces onto their matching dowels and cam bolts. A cam lock normally engages the head of a cam bolt when turned in the direction shown by its diagram; it does not work as a substitute for a missing bolt. If a joint stops with a visible gap, separate it and verify orientation rather than drawing two misaligned panels together with force.
The top panel usually completes a critical part of the cabinet structure, but its installation stage differs by manufacturer. On the Walker Edison Arundo, the instructions call for placing the top over the completed uprights and fastening the cam locks after the back panels have been slid into the grooves [Walker Edison, 2024]. Keep the assembly supported while another person helps rotate it if required. Do not move the heavy cabinet by lifting its loose top.
Step 3: Square the Cabinet and Secure Its Back Panels
Before installing rear boards, check that the cabinet stands straight and the grooves meet the edges of each panel. This step is structural on some flat-pack units: an out-of-square frame can make doors bind and put unnecessary stress on fasteners. In its 1822837COM booklet, Ameriwood Home explicitly tells builders to check for a square frame before attaching the back panels [Ameriwood Home, 1822837COM].
Slide or fasten the back panels exactly as the drawing shows. Some kits use plastic wedges and short screws to hold them in place; others fasten boards directly to the case. Avoid covering cutouts intended for cables or the heater. Locate the power-cord exit before final tightening, and make certain that no screws project toward wiring. The frame must be stable before adding the comparatively heavy fireplace insert.
Step 4: Install Shelves, Doors and Leveling Feet
Set shelf-support pins fully into the holes indicated by the manufacturer, then lower the shelves onto them. Check their finished edges and any notches that are meant to grip pins. For a cabinet with doors, attach the correct hinges and handles with the screw length shown. Where the hinges provide adjustment, close each door and correct an uneven gap using the appropriate adjustment point instead of bending the hinge arm.
If the feet are adjustable, set the cabinet level before installing the firebox, where the manual permits that timing. The Walker Edison Arundo sequence installs shelves, hinges, doors, rear wedges, and then adjusts the feet before inserting the fireplace [Walker Edison, 2024]. Another model might use a different order; use the diagram for your furniture. A wobbly frame that remains unstable on a level floor should be inspected for improperly seated hardware, not hidden with a rug.
Step 5: Fit the Correct Fireplace Insert and Its Brackets
Keep the electric insert disconnected from power. Locate the dedicated fireplace opening and follow the printed arrow or orientation diagram: do not assume the glass-fronted unit enters from the front. In the Walker Edison Arundo manual, the matching firebox slides into the opening from the rear and is retained by L-shaped brackets on both inner divider panels, using the supplied 12 mm screws [Walker Edison, 2024]. These dimensions apply to that Arundo assembly only.
Ameriwood Home 1822837COM instead shows its identified FA23V60L-C8 insert fitted at a specified later stage, with the relevant screws and LED-light components placed according to its own illustrations [Ameriwood Home, 1822837COM]. Do not drill additional holes, substitute an uncertified aftermarket heater, or clamp an insert by its glass trim. Before fastening brackets, check that the housing sits squarely, the cord routes without pinching, and all designed air openings remain unobstructed.
Step 6: Anchor the Stand and Perform the First Function Test
With the mechanical assembly completed, secure the cabinet to the wall where its manual instructs, using suitable hardware for the actual wall material and supporting structure. Anchor the television separately as directed by its maker. The CPSC advises anchoring televisions and furnishings to help prevent tip-over injuries, especially where children may climb [CPSC, 2025]. Apply the supplied load-limit label and verify the exact TV weight rating before putting the screen on top.
Only after the stand is stable and clear of tools should you follow the insert operating manual for a first power-on test. The Walker Edison Arundo instructions call for its fireplace to be plugged into a wall outlet with no other device connected to that outlet [Walker Edison, 2024]. If the maker requires direct wall connection, do not use a power strip or extension cord. Test the flame display, heat mode, controls, and shutdown as described for your unit, staying nearby while checking for abnormal noises, odor, or an error message.
Frequently Asked Questions
A few practical problems can arise even when the printed steps are clear. The answers below focus on preparation, replacement parts, and commissioning details that are easy to overlook in a flat-pack fireplace media console.
Can one person assemble a fireplace TV stand alone?
Sometimes, but check the specific instruction booklet before deciding. Ameriwood Home 1822837COM specifies two people and an estimated one-hour assembly for that cabinet; this does not mean every fireplace stand takes one hour [Ameriwood Home, 1822837COM]. Large panels can twist or fall while unsecured, and the firebox may need to be supported while another person installs its retaining brackets.
If the manual calls for assistance, arrange help before beginning, particularly for rotating the structure and lifting it upright. Do not rely on a stack of books or a chair to hold a heavy top panel while fastening it. The important measure is whether every stage can be supported in the orientation required, not whether one person could theoretically lift the finished furniture.
What if a predrilled hole is damaged or a part is missing?
Stop that connection and request the correct replacement part from the furniture manufacturer. A stripped cam-lock opening, cracked engineered-wood edge, or missing bracket may affect the integrity of the finished stand. Walker Edison directs customers to its support team for missing instructions, product damage, and spare parts [Walker Edison, customer service]. Do not conceal a damaged joint behind a finished panel.
Provide the model number, hardware letter or number, photo of the problem, and the relevant assembly-step number to support. Keeping the shipping carton and paper instructions until the first successful test makes identification easier. A substitute from a hardware store is only reasonable where the manufacturer expressly approves its specification and use.
Why are some screws or other fasteners left over?
A small surplus is not necessarily a mistake: Walker Edison states that its Arundo kit may contain extra hardware pieces [Walker Edison, 2024]. Nevertheless, an unused L-shaped insert bracket, mandatory anchor, or structural bolt is not something to set aside without checking the diagrams. Hardware designed for different stages can look nearly identical despite differing lengths.
Compare what remains with the original count and check each completed step in sequence. If a required component was skipped, correct it before loading a television or operating the heater. Do not add leftover screws at random into unused holes as an attempt to make the stand sturdier; extra drilling can weaken panels or damage internal heater components.
What if the firebox will not turn on after assembly?
First stop and consult the firebox owner’s manual. Check that the unit is securely seated, that the power cord has not been crushed, and that the indicated wall outlet is functioning under the manual’s permitted conditions. Many electric fireplaces have separate flame and heater functions, but their startup controls, thermostat settings, and fault indicators differ; no generic reset procedure is safe for every insert.
If the cord, plug, enclosure, or glass is damaged, leave it unplugged and contact the maker rather than opening the heater case. If a normal startup shows an error or the wall outlet becomes unusually hot, discontinue use and seek qualified assistance. A completed furniture assembly does not authorize bypassing a heater safety device or altering its factory wiring.
Final Thoughts
The safest way to handle how to assemble tv stand with fireplace is to treat the cabinet and the electric insert as one matched kit with instructions. Assemble and square the furniture, install the correct brackets, anchor the stand and TV, then test the heater as directed. Stop for missing or damaged parts rather than improvising.