Key takeaways
- You can build a simple desk footrest with a plywood top, two wooden support rails, and nonslip pads. If you want to know how to make a footrest for desk use, measure the gap beneath your feet before cutting wood.…
You can build a simple desk footrest with a plywood top, two wooden support rails, and nonslip pads. If you want to know how to make a footrest for desk use, measure the gap beneath your feet before cutting wood. The goal is a low, stable surface that supports both feet while you remain seated, not a step stool or a replacement for an adjustable chair.
As an Amazon Associate we earn from qualifying purchases.
By KK Home Furnishings Editorial Team
Plan and Measure Your Desk Footrest
First determine whether you need a footrest at all. When your chair and work surface fit and both feet rest comfortably on the floor, adding a platform can create unnecessary knee elevation. OSHA recommends full support on the floor or a stable footrest when the desk or chair arrangement leaves feet unsupported [OSHA, Computer Workstations: Chairs, accessed October 2026].
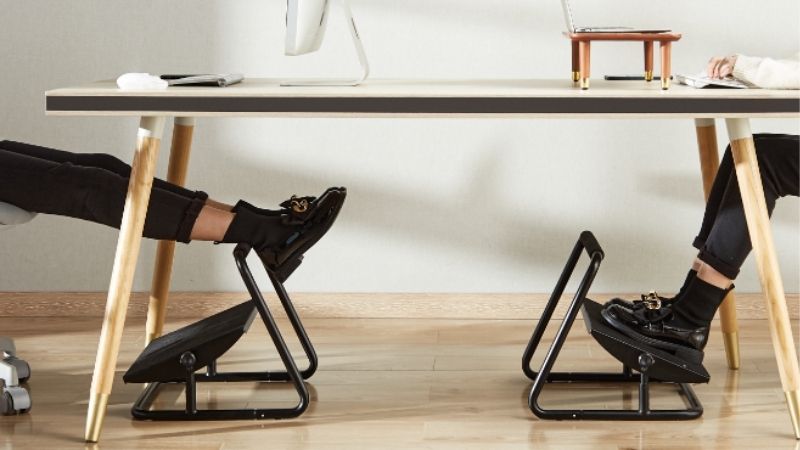
This beginner design is a fixed-height, flat wooden platform. The suggested cut dimensions are an illustrative home project, not a medical measurement or an official ergonomic size. If different people use the workstation, an adjustable commercial footrest may accommodate their changing seat heights better than a fixed platform.
| Material or Tool | Size or Specification | Cost Tier | Substitute or Note |
|---|---|---|---|
| Plywood top | Example: 16 × 12 inches, 3/4 inch thick | Low to mid | One intact, flat offcut with sound edges |
| Two wooden rails | Example: 2×2 nominal lumber, 11 inches long each | Low | Measured solid-wood strips of suitable strength |
| Wood screws | Six appropriately sized wood screws; verify thickness before use | Low | Fastener selected for your actual stock |
| Wood glue | Indoor woodworking adhesive and labeled cure time | Low | Use with mechanical fastening, not instead of it |
| Nonslip feet or strips | Four durable pads or continuous rail-length strips | Low | Floor-safe grippy material suited to your flooring |
| Drill, pilot bit, countersink, and clamps | Matched to chosen screws and stock | Existing tools or borrowed | Ask a shop to cut parts if you lack cutting tools |
| Sandpaper and optional finish | Smooth exposed edges; use finish as labeled | Low | Leave unfinished if clean, smooth, and splinter-free |
Check Whether a Footrest Fixes Your Actual Problem
Sit fully back in your chair with the seat adjusted for your desk and hands. If your heels hover, lightly slide a firm, stable object under your feet to see how much support is missing. Keep your lower legs free to move, and make sure the seat edge does not press behind your knees. CCOHS recommends a footrest when a fixed-height desk requires raising a chair so the feet no longer reach the floor [CCOHS, Office Ergonomics: How to Adjust Office Chairs, confirmed February 2025].
Do not add height to compensate for an overly high chair if you can safely lower the seat and still work comfortably. Nor should a footrest conceal a desk that traps your knees under its apron. A foot support can complete a sound setup, but it cannot correct every mismatch in chair depth, keyboard location, or under-desk clearance.
Measure the Height, Footprint, and Legroom Before Cutting
Measure the distance from the floor to where your feet naturally need support while sitting with your back against the chair. Test that position using a stable temporary surface that does not slide. The height you settle on is specific to your seat, shoes, and desk. Avoid copying a published platform height as though it fits every user.
For a compact example, a 16-by-12-inch top offers space for two feet, but check your shoe width and preferred stance before choosing it. Position the mock-up under the desk and move your knees, chair casters, and feet through ordinary movements. OSHA’s workstation checklist calls for enough forward foot clearance and a stable foot support rather than a cramped platform [OSHA, Workstation Evaluation Checklist, accessed October 2026].
Choose a Fixed Wooden Platform Only If It Fits
A flat plywood platform on two short rails is easier to build and inspect than an adjustable hinge or a homemade seesaw. It can be appropriate for one workstation with a consistent chair height. Check the actual dimensions of the wood sold as nominal 2×2 lumber; dressed pieces commonly measure about 1.5 inches square, but the stock in your hands must determine the finished rise [Home Depot, 2×2 lumber product specification, accessed October 2026].
This sample combination of a 3/4-inch top and 1.5-inch-tall rails creates a platform roughly 2.25 inches high before nonslip pads. Treat that figure only as the result of this example, not a recommended elevation. If your measured gap differs, redesign with suitable materials or choose an adjustable product; do not stack loose boards or improvise unstable extensions.
How to Build a Desk Footrest Step by Step
Make one rectangular platform with two lengthwise supports underneath. Complete each stage before advancing, and do the cutting and drilling on a clamped work surface away from the desk. The construction below is a small foot support for seated use only; it is not designed or tested to bear a person’s full standing weight.
Step 1: Mark a Top That Clears the Desk and Chair
Mark the top to your chosen width and depth. The illustrative 16-by-12-inch rectangle is a starting drawing, not a required specification. With the board still uncut, slide a similarly sized cardboard template under the desk to ensure your feet can rest side by side while the chair rolls and swivels without hitting the planned rest.
Allow enough floor space behind and around the platform so you can withdraw your feet easily and change sitting position. A very deep board may catch the chair base, while a board cut narrowly to one shoe will not give the stable two-foot support that workstation guidance describes. Revise the template before using a saw.
Step 2: Select Rail Placement and Dry-Fit the Wood
Set two straight wooden rails beneath the left and right portions of the top, running front to back. For the example, two 11-inch rails fit under a 12-inch-deep top with a small inset at both ends. Keep the supports symmetrically spaced, away from the outermost edge, and flat against the board so the assembled platform will not rock.
Dry-fit everything on a level floor without fasteners. Confirm the rails do not twist and the top is not bowed or delaminated. If you change the board size or rail material, reconsider fastener placement and support spacing rather than copying the sample blindly. Reject cracked, warped, or brittle offcuts before assembly.
Step 3: Cut Components With the Work Clamped Securely
Cut the plywood and rails to the measured marks, following your saw manufacturer’s instructions and using appropriate eye protection. Clamp each piece to a stable bench; never hold short timber with one hand in the blade path. If you do not have suitable tools or experience, ask a lumberyard or workshop to make the straight cuts for you.
After cutting, inspect corners and edges for splinters, exposed voids, or cracks. Test the pieces together once more before drilling. Small discrepancies can often be corrected with proper recutting, but do not fill a broken structural joint with putty and assume it will safely carry repeated foot pressure.
Step 4: Sand Contact Edges and Plan the Grip Surfaces
Sand the top, corners, and any exposed edges until there are no rough points against shoes or socks. Slightly round the accessible edges rather than leaving sharp plywood corners. Remove sanding dust before gluing or finishing, and examine the underside so there are no slivers where a hand might reach to reposition the rest.
Choose a nonslip covering for the top if your footwear slides on smooth wood, and reserve durable pads for the underside. Verify that adhesives, rubber, and any optional finish are compatible with the floor or carpet beneath the footrest. The purpose of the grip is to keep the rest from scooting when feet are placed on it, not to glue it permanently to the floor.
Step 5: Glue, Predrill, and Fasten the Rails
Mark a line above the center of each rail and lay out three screw locations along each line, comfortably inboard from the ends. Clamp the rails in place beneath the top, then drill pilot holes appropriate for the wood species and the screws selected. Pilot holes reduce splitting and help screws travel straight [Lowe’s, How to Drill a Pilot Hole, August 2026].
Apply woodworking glue to the rail contact faces, clamp the assembly, and drive appropriately sized screws through countersunk top holes into the rails. Screw tips must not emerge below or beside the rail. Stop driving once the heads sit flush and the joints are snug, not after the wood crushes. Follow the adhesive’s labeled cure instructions before loading the platform.
Step 6: Add Nonslip Pads and Run a Seated Stability Check
Place floor-compatible gripping pads beneath both rails, with contact distributed so the base does not pivot or rock. On a flat floor, push gently with your hands from different directions to check for movement and rattling. Then sit in your chair and press with one foot at a time before resting both feet. Stop if you notice sliding, cracking, rocking, or a loose joint.
Finally, check that your feet are supported without forcing your knees high or pushing you away from the chair back. Oregon OSHA describes a good footrest as stable, large enough for both feet, and covered with nonslip material [Oregon OSHA, Evaluating Your Computer Workspace, accessed October 2026]. Keep the rest out of the chair caster path, and never use this DIY platform as a standing step.
Frequently Asked Questions
Can I Make a Desk Footrest Without Power Tools?
Yes, a temporary test support can be assembled without sawing or drilling, but it should not be confused with a durable custom-built wood platform. A ready-made, rigid item with a broad level base may help you check the correct height while seated. It must not collapse, tip, slide, or have sharp edges against your legs.
For a lasting solution, have a hardware store cut the timber and use suitable hand tools only if you can make reliable joints. Avoid piles of books, loose boxes, and rolling objects as permanent supports; they may shift during work. A commercially made, adjustable footrest is a better option when you cannot verify a safe DIY assembly.
Does a Footrest Have to Be Angled Instead of Flat?
No single angle suits everyone. A flat surface may provide useful support when your feet need only modest elevation, while an angled or adjustable platform can allow a different ankle position. The correct choice depends on the height of the desk and chair, your footwear, the available legroom, and how freely you can move.
OSHA’s workstation evaluation checklist favors angled support for both feet, and Oregon OSHA advises a portable footrest that can be adjusted in incline [OSHA, Workstation Evaluation Checklist; Oregon OSHA, Evaluating Your Computer Workspace]. If you need changing angles or heights, do not attempt to create them by slipping loose wedges beneath this simple fixed design.
Can a Wooden Footrest Damage Hardwood or Laminate Floors?
It can, especially if a screw protrudes, an abrasive grit particle gets trapped underneath, or hard rails are dragged across a delicate surface. Check the base after assembly and whenever the footrest is moved. Pads should cover the contact points and be appropriate for your flooring, since some rubber and adhesive formulations can discolor certain finishes.
Follow the flooring manufacturer’s guidance on suitable protectors and clean grit from both the floor and pads. Lift the platform to reposition it rather than scraping it along the surface. Inspect or replace pads when they detach, wear through, or leave exposed wood against the floor.
Should I Use the Same Footrest With a Standing Desk?
Only when sitting, and only if the seated height arrangement leaves your feet unsupported. When you raise a sit-stand desk for standing tasks, the footrest may become a trip hazard or a barrier to repositioning your feet. Move the platform out of the standing zone before raising the desk or walking around it.
If your workstation alternates between sitting and standing several times each day, consider a compact rest you can remove easily. A fixed wooden platform cannot change with the user as readily as an adjustable model. Recheck chair height, keyboard position, and under-desk clearance after every substantial workstation change rather than assuming a footrest solves all of them.
Final Thoughts
Learning how to make a footrest for desk use starts with fit, not a universal cutting plan. Measure your seated foot position, build a low wooden platform only if it matches that gap, and use secure rails, smooth edges, and floor-safe grip. Test the finished rest while seated, and replace it with an adjustable model if you need changing heights or tilt.