Key takeaways
- A diy boho tv stand works best when the relaxed look comes from color, texture, and well-chosen details rather than an improvised structure. Start with a sound media cabinet or a verified cabinet plan, then add woven cane, wood tones,…
A diy boho tv stand works best when the relaxed look comes from color, texture, and well-chosen details rather than an improvised structure. Start with a sound media cabinet or a verified cabinet plan, then add woven cane, wood tones, and quiet hardware. Keep the top suitable for your television, the electronics ventilated, and the whole setup securely anchored.
As an Amazon Associate we earn from qualifying purchases.
By KK Home Furnishings Editorial Team
Plan and Measure Your Boho TV Stand
Choose the construction route before buying cane or paint. Refinishing an existing TV-rated console keeps most of the structural work out of the project; building from plywood gives you more control over the openings. Both can look bohemian, but neither option makes a weak cabinet safe merely by adding decorative panels or new legs.
Choose a Boho Design That Does Not Fight the Room
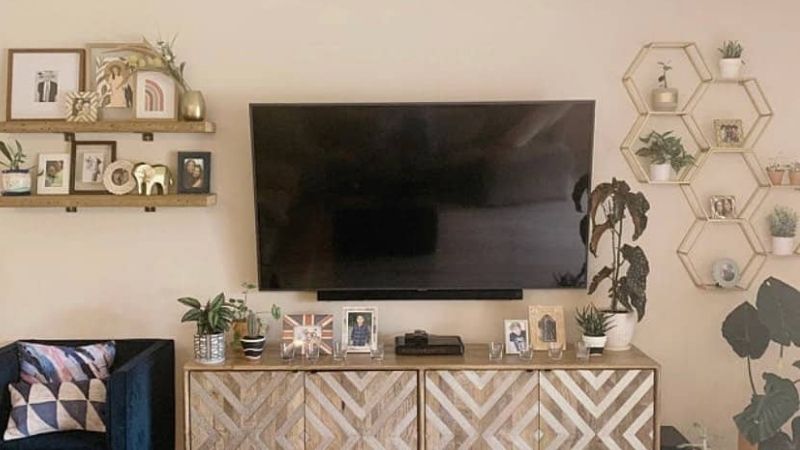
Boho is a mood rather than a single cabinet shape. A restrained palette of warm white, sand, oak, and muted clay leaves room for baskets or artwork to provide color. Woven cane can be the main texture on one or two door fronts; keeping the rest of the case plain prevents the furniture from competing with the television screen.
Sketch the cabinet front before purchasing material. Decide which bays should stay open for remotes and receivers, which doors need hinge clearance, and which shelves will hold books or baskets. If the room is already filled with patterns, try one cane accent instead of coating every surface in another texture. This keeps the result useful.
Measure the TV Base, Storage, and Electronics First
Measure the complete footprint of the television feet or pedestal, and check the weight specified in the exact TV manual. The diagonal screen size is not a substitute for the base measurements. Allow room to reach the power outlet and route cables without bending connectors sharply. Do not assume an old sideboard is designed to support a TV.
Measure the devices going inside the cabinet, including their connections and required airflow clearance. An AV receiver can need open space around its vents; the Denon AVR-1906 manual, for example, warns against installing that receiver in a confined bookcase [Denon, 2005]. Apply the instructions for your actual equipment, not that example as a universal distance.
Choose Cane, Cabinet Materials, and a Finish You Can Maintain
For a from-scratch case, use an established plan with defined panel dimensions, joinery, and bracing. The Kreg-hosted Plywood Media Console plan shows a cabinet assembled from plywood panels with internal supports and a back panel [Kreg Tool, accessed October 2026]. This is a construction reference, not evidence that every homemade cabinet carries a particular TV load.
Cane webbing suits framed decorative openings, while plywood, sound solid wood, and suitable hardware perform structural jobs. Rockler demonstrates natural cane held in routed channels with reed spline after soaking, then tensioning as it dries [Rockler, 2025]. If you choose a prefinished or synthetic weave instead, use its own installation instructions rather than assuming it behaves like natural cane.
| Material or Tool | Size or Spec | Cost Tier | Substitute |
|---|---|---|---|
| Existing TV-rated console | Sound case, suitable top and original rated use | Lower effort | Documented cabinet plan with sound material |
| Cabinet plywood | Panel thickness and cut list from a credible plan | Core build material | Manufacturer-approved replacement panels |
| Natural cane webbing | Weave and installation method for door opening | Accent material | Cane-look panel with its own fixing system |
| Door frames, hinges and pulls | Matched to door weight, thickness and swing | Hardware | Reuse functioning original cabinet hardware |
| Water-based finish | Compatible with prepared substrate and care directions | Finishing supply | Manufacturer-approved cabinet paint system |
| Clamps, drill and saw | Appropriate to joints and selected cabinet plan | Workshop tools | Precut panels and a borrowed clamp set |
How to Build a Boho TV Stand Step by Step
This workflow works for either a suitable existing media console or a cabinet built to a documented plan. Keep the structural tasks and the decorative tasks separate. Complete the body first, verify door fit before cutting cane, then finish and position the console. Stop if the case rocks, a finish is unknown, or the mounting instructions cannot be followed.
Step 1: Pick a Sound Base or Follow a Proven Cabinet Plan
For an upcycle, inspect the cabinet for damaged feet, loose joints, swollen particleboard, sagging shelves, and a wobbly back. Find any manufacturer instructions or TV-use rating before treating it as a television stand. If none is available, do not invent a weight capacity. Consider a rated media console instead of turning an arbitrary dresser into a TV support.
For a new build, follow the panel sizes, joints, fasteners, and sequence in one complete plan instead of combining isolated dimensions from several tutorials. The Kreg Plywood Media Console example specifies a case, base, shelves, and back panel as connected parts [Kreg Tool, accessed October 2026]. Keep those structural elements even if your exterior finish looks different.
Before cutting, mark the intended door clearances and the position of the electronics. Check that cabinet legs, if used, are part of a supported design rather than an afterthought glued to a thin panel. A low, stable unit may suit a TV better than fashionable tall tapered legs when support details are uncertain. Decoration comes after the load path.
Step 2: Prepare the Cabinet and Protect Unknown Finishes
Remove working doors, drawers, knobs, and shelves only when the design allows it, labeling each component for reassembly. Clean away grease and dust with a product suitable for the surface, and allow it to dry. Test the proposed primer or coating on an unobtrusive area because glossy laminates, old paint, and bare wood do not all bond to the same finish system.
Do not sand or scrape an old coating whose composition is unknown. EPA warns that disturbing lead-based paint in pre-1978 housing can create hazardous dust and recommends appropriate assessment and lead-safe practices [U.S. EPA, 2026]. Furniture provenance may differ from housing, so the warning is a reason to investigate suspect painted salvage, not to claim every older cabinet contains lead.
If the substrate is confirmed suitable, lightly prepare it according to the coating maker, keeping dust contained and surfaces clean. A dedicated primer may be needed on smooth cabinet finishes; verify compatibility instead of guessing. Set aside any parts showing rot, splits, or failing joints. A smooth coat of paint will not restore the missing strength of damaged furniture.
Step 3: Assemble the Case and Create Framed Door Openings
For a new cabinet, dry-fit the top, bottom, sides, dividers, and base so you can check squareness before fastening them. Use glue and the joinery specified by the plan, and keep the back or other bracing components called for there. If you are upgrading a suitable existing console, retain its structural partitions unless the manufacturer or a qualified furniture builder approves changes.
Make a light door frame only when the selected hinges and joinery can carry the finished door. Mark the cane opening so the frame stays wide enough for its own attachment method, and check the diagonal fit against the cabinet front. Do not remove so much material from a solid load-bearing door that it loses stiffness. When in doubt, build replacement inset doors.
Test each frame on its hinges before applying glue, stain, or webbing. Confirm that doors clear the base, do not drag on shelves, and can open far enough to access electronics. Keep a narrow, consistent reveal, but let the hardware instructions determine the actual spacing. A tidy door gap matters more than an exact figure copied from someone else’s cabinet.
Step 4: Install Cane Webbing Without Using It as a Support
Check whether your cane is natural, prefinished, or synthetic. In Rockler’s natural-cane media-cabinet demonstration, the material is soaked, fitted into a channel, and locked with reed spline so it tightens as it dries [Rockler, 2025]. Follow the webbing supplier’s preparation and installation method for your product, especially if its finish rules out soaking.
Cut and secure decorative webbing only after you have confirmed the opening dimensions on a test frame. Keep tension even and protect the weave from sharp staples or exposed fasteners. Cane can cover a door opening but should not replace the wood frame, hinge mounting surface, back bracing, or top support. This division of jobs is what keeps texture from becoming a structural shortcut.
Before hanging the completed door, check the cane edges for rough ends and make sure fingers cannot reach sharp hardware. A receiver behind a cane panel still requires the clearances stated in its manual; an airy weave does not automatically make an enclosed shelf well ventilated. Choose open shelving for equipment that cannot safely operate within the planned cabinet.
Step 5: Apply a Calm Finish and Refit the Hardware
Choose a paint or stain based on the underlying surface, desired color, and manufacturer instructions. A pale neutral case with a natural cane insert often needs fewer decorative additions than a multicolored cabinet. Test the finish on a hidden area to see how it looks under the room’s lighting. Keep spills and abrasive products away from untreated woven surfaces.
Minwax directs users of its water-based wood finishes to begin with properly prepared wood, remove dust, and use adequate ventilation during application and drying [Minwax, accessed October 2026]. Specific coating intervals depend on the named product, humidity, and substrate. Follow that product’s label for recoat and normal-use times instead of assuming every water-based coating cures alike.
When the finish has reached the handling condition stated by the manufacturer, refit doors and pulls. Tighten hardware to its instructions without stripping screw holes, and check each door for rubbing. Choose handles that can be wiped clean and will not snag cane strands. If you add baskets, keep them inside supported shelves rather than hanging them from decorative cane.
Step 6: Position, Anchor, and Check the Finished TV Setup
Set the finished cabinet on a level, suitable floor and check for rocking before adding anything. Confirm that the television base fits the actual top, that the cabinet and its supporting design accommodate the TV weight, and that no accessory blocks rear vents. Arrange cords where doors cannot pinch them. If any of these conditions fail, change the setup before use.
The U.S. Consumer Product Safety Commission recommends using furniture designed for televisions, securing TVs that are not wall mounted, and anchoring furniture properly [CPSC, 2026]. Follow the relevant TV and anchoring-hardware instructions and fasten to suitable wall structure. Decorative cane, newly painted feet, or a heavy basket on a lower shelf is not a substitute for proper restraints.
Finish with a functional check: doors open freely, plugs remain accessible, storage items stay within supported bays, and nothing invites climbing near the screen. A boho-style console should work without fragile hanging decorations around children or pets. Recheck fasteners after the first period of use and whenever the cabinet is moved. Do not treat a DIY build as professionally load certified.
Frequently Asked Questions
The most useful follow-up questions concern how much equipment a room really needs, whether a full workshop is necessary, and how decorative materials age. These answers address those choices without repeating the full construction sequence. For any furniture or electrical equipment you already own, the maker’s instructions remain the first reference.
Can You Make a Boho TV Stand Without a Workshop?
Yes, a cosmetic update to a sound, TV-suitable console can use premade doors, replacement pulls, removable styling pieces, and an appropriate finish rather than a new plywood build. You still need basic measuring equipment and a safe place to prepare and apply finishes. The project becomes more demanding if you must cut new cane openings or change hinge locations.
Ask a cabinet shop to cut panels or make fitted frames when you cannot work accurately with power tools. Keep any structural alterations within the scope of a documented plan. Even a low-tool makeover should not obscure the original hardware or block ventilation. If your unit is unstable or has no defensible TV-use suitability, replacing it is safer than a decorative refresh.
What If the Room Is Too Small for a Wide Console?
Choose a narrower cabinet only after measuring the television’s complete support footprint and the intended placement. A floating shelf does not automatically solve the problem because it introduces wall-support and load-rating requirements of its own. Moving small accessories elsewhere may be easier than squeezing a screen onto a surface that is too narrow for its base.
In small rooms, limit the visual weight of the cabinet: shallow-looking lines, a restrained finish, and one woven detail can keep storage from dominating the wall. Leave the walking route clear, particularly where cabinet doors swing out. If a floor console does not fit safely, consider a correctly installed wall-mounted TV with separate storage instead of using undersized furniture.
Does Natural Cane Need Special Care Over Time?
Yes. Natural cane can react to moisture and physical stress, so clean it gently and follow the particular webbing supplier’s guidance. Avoid soaking an installed door just because the raw webbing was dampened during assembly. Vacuum loose dust using a suitable soft attachment or remove it with a soft brush rather than scraping the woven strands with a rigid tool.
Watch for broken strands, loose retaining spline, or a door frame that has gone out of square. Repair the panel according to the assembly method instead of pulling on loose cane or attaching heavy objects to it. A prefinished synthetic weave may have different cleaning instructions; choose the care method based on the actual material rather than appearance alone.
Can Renters Use a Boho TV Stand Without Drilling the Wall?
A renter can choose freestanding media furniture and reversible decorative upgrades, but that does not remove tip-over risks. Ask the property manager about approved anchoring locations and repair rules before purchasing. If anchoring cannot be done, revisit whether the intended furniture and screen arrangement is appropriate rather than treating removable adhesives as equivalent restraints.
CPSC advises using a sturdy, low support and placing the TV back from the edge when anchoring is impossible, while still emphasizing anchoring as an important protection [CPSC, 2026]. Keep cords controlled and do not place attractive items high enough to encourage climbing. A wall-mounted television should also follow the mount maker’s requirements for suitable wall structure.
Final Thoughts
A successful diy boho tv stand keeps style and structure in separate roles: use a sound TV-suitable case, reserve cane for decorative panels, and choose a finish that matches your room and materials. For a first project, updating a rated console is often more manageable than building an unverified frame. Confirm device ventilation and anchoring before styling the shelves.