Key takeaways
- Start with the pad flat on the mattress, attach its controller firmly while the power is disconnected, route the cord clear of the bed frame, and plug it into a suitable wall outlet. Then switch it on, choose a modest…
Start with the pad flat on the mattress, attach its controller firmly while the power is disconnected, route the cord clear of the bed frame, and plug it into a suitable wall outlet. Then switch it on, choose a modest heat setting, and use the timer specified for your model. This guide to how to use heated mattress pad controls follows a current North American Sunbeam manual as a documented example, while identifying steps you must verify for your own brand.
As an Amazon Associate we earn from qualifying purchases.
By KK Home Furnishings Editorial Team
Before the First Night: Know the Pad and Its Controls
Using a heated mattress pad is a short operating routine, not a test of how hot the fabric can get. The most important preparation is identifying the exact model: controllers, timers, and approved bed types vary. Sunbeam manual IMBCCY24EF-A, issued in 2026 for North American heated bedding, gives a specific four-stage setup and a 12-level controller example [Sunbeam Home, 2026]. Apply its numbers only if your own label and manual match.
| What to Identify | Meaning for Daily Use | What You Should Do |
|---|---|---|
| Model label and manual | Identifies the permitted bed type, user restrictions, and setup order | Read before connecting power; do not transfer instructions across brands |
| One controller | Typically operates the complete heated area on a single-control design | Set warmth from the control supplied with that model |
| Two controllers | The documented Sunbeam design controls the two sides separately | Check which controller governs your side |
| Heat setting | Sunbeam IMBCCY24EF-A offers levels 1 through 12 | Treat numbers as control settings, not measured degrees |
| Auto-off selection | That Sunbeam controller can select 1 through 12 hours | Choose an appropriate duration; do not assume every pad has this range |
| Prewarming option | Some product pages mention preheating; not every manual describes a separate button | Warm the bed only as the model instructions permit |
Find the Exact Model Instructions Before Connecting Power
Start with the sewn-in product label and the controller markings. Record the model number rather than relying on a familiar brand logo: even two Sunbeam pads may use different control generations. A printed instruction manual takes priority over an online product description. Confirm whether the pad is intended for household sleeping, what mattress sizes it fits, and whether it permits your type of bed base.
Check who will be using it before the first session. The 2026 Sunbeam manual specifically says not to use the covered heated products with infants, children, people who cannot operate the controls, people with diabetes, or anyone who cannot sense heat reliably [Sunbeam Home, IMBCCY24EF-A, 2026]. Those are restrictions of this documented product family, not a diagnosis or a substitute for guidance about your particular situation or device.
Recognize Single-Zone, Dual-Zone, and Timer Functions
A single controller usually means one set of warming adjustments for that pad. With the dual-control Sunbeam design described in the 2026 manual, each control works independently and warms only one side [Sunbeam Home, IMBCCY24EF-A, 2026]. On a shared queen or king bed, agree which control belongs to each sleeper before starting. Do not assume the right-hand control always runs the same side on every brand or installation.
Separate three ideas that are easy to confuse: a heat level changes the requested warmth, an auto-off selection limits operating time, and a memory function recalls a previous choice on some models. None is a thermostat readout of the fabric temperature. The current Sunbeam manual describes 12 warming levels, adjustable auto-off from 1 through 12 hours, and remembered settings for the controller it covers [Sunbeam Home, 2026].
Plan a Simple Session Instead of Chasing a Universal Setting
A useful first-night plan is to start lower than you think you need, allow the bedding time to feel comfortable, and adjust deliberately rather than jumping to the maximum. A numbered control position does not tell you how the heat will feel through different sheets, in different rooms, or to different sleepers. The goal is a comfortable bed, not a particular numerical setting or surface-temperature promise.
Decide whether you want a warm bed before getting in or continued warmth during the night. Either approach is governed by your manual; a selectable auto-off timer is not permission to leave a product running against its stated restrictions. The 2026 Sunbeam instructions require turning the unit off or unplugging it when not in use [Sunbeam Home, 2026]. Keep the controller accessible rather than hidden beneath bedding.
How to Use a Heated Mattress Pad in Six Clear Steps
The sequence below separates physical setup, electrical connection, and nightly operation. Its order follows Sunbeam 2026 North American bedding instructions where those apply: place the pad, connect the controller, route the cord, and only then connect wall power. Always use the controller supplied for your particular pad. If your own manufacturer prescribes a different setup, do not mix two sets of instructions into a homemade procedure.
Step 1: Inspect the Pad and Fit It Smoothly on the Mattress
With the power cord unplugged, remove the pad from its packaging and unfold it fully. Look for damaged stitching, a cracked connection housing, a cut cord, scorch marks, or exposed wire. A pad with any of these problems should stay unplugged while you contact the maker. For Sunbeam IMBCCY24EF-A, the installation illustration calls for the product label to be at the foot of the bed facing upward [Sunbeam Home, 2026].
Ease the fitted skirt over the mattress corners and smooth the heating area without stretching the internal wiring or leaving ridges. Do not fold a section underneath just to hide extra fabric; use the size and bed construction approved for the product. The detailed choice of which additional bedding layers may go over a heated pad belongs to the manufacturer instructions, not a universal rule based on how an ordinary mattress protector is placed.
Step 2: Connect the Supplied Controller Firmly
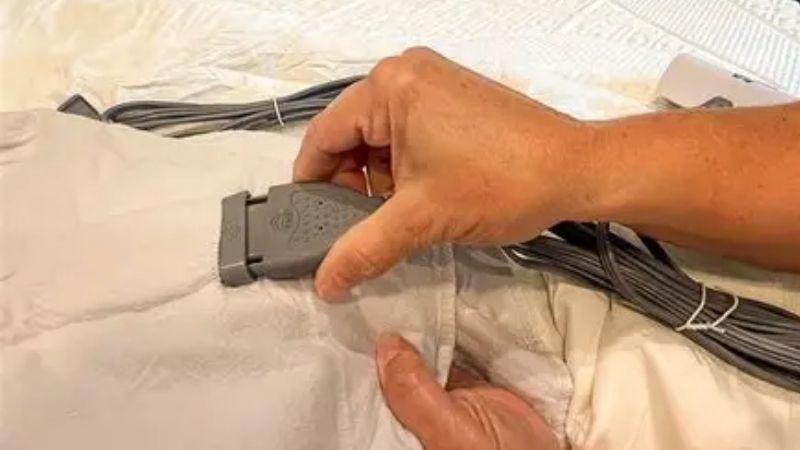
Locate the connection module on the pad before connecting anything to the wall. On the 2026 Sunbeam example, the controller cord plugs into the bottom module until the plastic hinges click into place. The instructions warn that a loose connection presents a fire risk [Sunbeam Home, IMBCCY24EF-A, 2026]. Use the connector’s intended gripping surfaces and inspect that it is fully seated; never force an unfamiliar connector shape.
If the pad has two controllers, connect both only in the manner shown by the relevant manual and keep each cord associated with its own side. Do not borrow a control unit from another electric blanket merely because the plug looks similar. Sunbeam specifically instructs users to operate its covered pad with the controller included with that unit [Sunbeam Home, 2026]. A missing, damaged, or incompatible control requires manufacturer assistance, not a makeshift substitute.
Step 3: Route the Cord Safely, Then Plug Into the Wall
Before plugging in, run the cord along the route specified by the product documentation. The Sunbeam 2026 guide directs the control cord onto the floor beneath the bed, without sandwiching it between mattress and foundation or catching it against a frame, leg, or headboard [Sunbeam Home, IMBCCY24EF-A]. Keep the hand controller somewhere dry, visible, and easy to reach, with enough slack to prevent tugging when someone enters or leaves the bed.
Connect the fully assembled product to a correctly fitted 110 to 120 volt wall outlet for this North American Sunbeam model. Its manual expressly forbids extension cords, smart plugs, multi-outlet adapters, generators, and inverters; it also says not to use an outlet that feels warm or grips the plug loosely [Sunbeam Home, 2026]. These exact conditions must be checked for the product you own. Never plug in first and try to connect the mattress-pad module afterward.
Step 4: Turn On the Control and Adjust the Warmth Gradually
Press the power button shown in the instruction booklet. On the documented 2026 Sunbeam controller, the on/off key starts the device, while increase and decrease buttons change the heat level from 1 through 12 [Sunbeam Home, IMBCCY24EF-A]. That is a range of selectable settings, not a guarantee that level 6 or level 12 corresponds to the same temperature on other models. Confirm the chosen value on the controller display before leaving it in position.
Give the warming fabric time to work under the bedding arrangement the maker permits, then assess comfort rather than repeatedly increasing the number within a few seconds. If warmth feels excessive, turn it down or off. A heater designed to warm a bed is not intended to imitate the immediate intense heat of a therapeutic heating pad. The controller may feel warm during normal Sunbeam operation, but a damaged cord, burning smell, or abnormal behavior is a reason to switch off and unplug.
Step 5: Prewarm the Bed and Set an Appropriate Auto-Off Time
For prewarming, switch on the fitted pad ahead of bedtime in the manner your manual permits, then select the warmth you want when you get into bed. Some heated bedding models have a labeled preheat function; others rely on their normal heat controls. The Sunbeam Honeycomb Quilted Plush product description promotes prewarming, but its 2026 controller manual does not establish a universal, separately timed preheat button [Sunbeam Home, product listing and IMBCCY24EF-A, 2026].
If using the documented Sunbeam auto-off feature, press its timer button and choose a duration from 1 through 12 hours with the adjustment buttons. The manual says the display returns to the heat setting after about four seconds, and dual controls operate independently [Sunbeam Home, IMBCCY24EF-A, 2026]. Choose a duration consistent with the product instructions and your planned use; do not assume an auto-off feature makes every type of overnight operation safe for every sleeper.
Step 6: Check Comfort, Power Down, and Reset for Next Time
Before settling in, confirm that the pad remains flat, the controls are accessible, and the selected warmth feels appropriate. If one person prefers less heat on a dual-zone pad, adjust that person’s controller instead of raising both sides. After the planned session, use the on/off button and unplug when the appliance is not in use, in accordance with the 2026 Sunbeam instructions. Let the pad cool before any rearranging or storage.
For the next use, make a brief visual check of the fabric and cords before repeating the same setup routine. If your controller remembers the last temperature, do not assume its last setting is automatically your best choice tonight. After an interruption to electrical power, the current Sunbeam manual says the auto-off timer returns to its original setting and operation must be restarted with the power button [Sunbeam Home, 2026]. Recheck the display before use.
Frequently Asked Questions
These answers cover operating details that are easy to miss when first learning the controls. They address the documented North American Sunbeam 2026 design unless otherwise stated. Use your model’s booklet to resolve differences rather than transferring display behavior, outlet requirements, or bed restrictions from one manufacturer to another.
Why Does the Controller Screen Go Dim After I Choose a Setting?
A dim display does not necessarily mean that the pad has switched off. The 2026 Sunbeam controller is designed to reduce its display brightness after about ten seconds, making the light less distracting in a dark bedroom [Sunbeam Home, IMBCCY24EF-A, 2026]. The active heat and timer settings are separate from the display brightness, so a dim screen alone is not evidence of a malfunction.
On this model, pressing an adjustment or auto-off button wakes the screen. Confirm the illuminated setting and avoid repeatedly cycling power solely to brighten it. If the controller has no display, shows an unfamiliar warning pattern, or responds differently from this example, check its own manual rather than trying to interpret a different model’s indicator lights.
Can I Use a Smart Plug to Turn the Pad On Before I Get Home?
Not for the Sunbeam heated bedding covered by manual IMBCCY24EF-A. Its 2026 electrical instructions explicitly prohibit smart plugs along with extension cords, multi-outlet adapters, and other power adapters [Sunbeam Home, IMBCCY24EF-A, 2026]. An app-controlled outlet does not override that restriction, even if you only intend to prewarm the bed.
For a different brand, follow the manufacturer’s written directions concerning remote switches and automatic timers. Never assume a third-party device can safely replace the bundled control system. If convenience is the goal, look for manufacturer-supported scheduling in the product documentation rather than designing your own remote-start arrangement.
Can I Use a Heated Mattress Pad on an Adjustable Bed?
You cannot use the specific heated bedding covered by the 2026 Sunbeam manual on a mechanically adjustable bed, because the manufacturer’s warnings exclude that bed type [Sunbeam Home, IMBCCY24EF-A, 2026]. An adjustable base can bend or compress bedding in ways a fixed mattress does not, so apparent physical fit alone does not establish that a pad is appropriate.
Other products may have their own compatibility statements; there is no reason to generalize the Sunbeam restriction to every pad without checking. Look for explicit approval covering both the mattress-pad model and the intended adjustable base. If that approval is not available, do not experiment by operating the pad while articulating the bed.
What Should I Do If Electricity Goes Out During a Warming Session?
For the documented Sunbeam controller, the manual says that after a power failure you press the power button to restart warming. Its auto-off timer also resets to an original setting following the interruption, even though the controller has a memory feature for normal preferences [Sunbeam Home, IMBCCY24EF-A, 2026]. That distinction matters if you had selected a shorter session before the outage.
Wait until supply power is stable, check the bed and connections without handling energized plugs, and confirm the displayed heat level and timer again before resuming. Different controllers may restart or remain off in different ways. If the power event is followed by an unusual display or electrical odor, unplug the pad and request model-specific support rather than trying repeated restarts.
Final Thoughts
Learning how to use heated mattress pad controls comes down to a dependable sequence: check the model instructions, fit the fabric flat, complete all connections before wall power, adjust warmth deliberately, and confirm the auto-off choice. The separate how-to topics of laundering, component failure, and bedding-layer placement deserve their own model-specific guidance. For everyday comfort, use the supplied controller and let the manufacturer’s restrictions set the limits.