Key takeaways
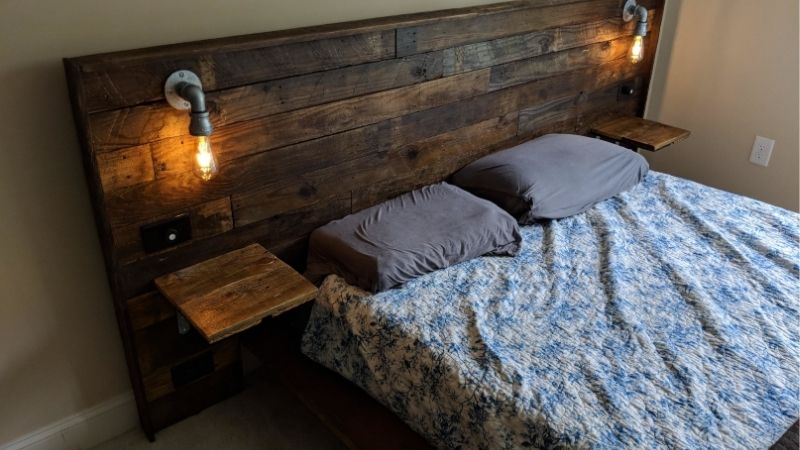
- The safe way to build a diy headboard with shelves and lights is to use listed low-voltage or plug-in LED lighting, plan cable routing before cutting, and anchor it to the right wall type, never hiding improvised mains wiring inside…
The safe way to build a diy headboard with shelves and lights is to use listed low-voltage or plug-in LED lighting, plan cable routing before cutting, and anchor it to the right wall type, never hiding improvised mains wiring inside the wood. This guide covers the plan, the build, and the safety.
As an Amazon Associate we earn from qualifying purchases.
By KK Home Furnishings Editorial Team
Plan and Measure Your DIY Headboard With Shelves and Lights
A safe, square build starts with planning, so measure and decide first: set the headboard width from the mattress, choose the shelf depth and placement, plan the cable routing before any cuts, and decide between wall-mounted and bed-frame-mounted, since the mounting shapes how everything else attaches.
| Material or Tool | Size or Spec | Cost Tier | Substitute |
|---|---|---|---|
| Plywood back panel | ~18 x 60 in (example project) | Mid | Size to your mattress width |
| LED tape (listed, low-voltage) | ~16 ft (example BOM) | Budget | Plug-in LED strip, UL/ETL listed |
| Frame boards | 1×4 nominal lumber | Budget | 1×3 or 1×6 by design |
| Screws | 1.25 in #6 + 2.5 in | Budget | Sizes to match your lumber |
| Wall anchors | Matched to wall type | Budget | Toggle or masonry anchors as needed |
Set Headboard Width From the Mattress
Size the headboard width from the mattress, not a guess, so it frames the bed correctly. A Queen headboard like the IKEA BRIMNES is about 62.25 inches wide for a 60-inch Queen mattress, so start from your mattress width, since a headboard a little wider than the mattress reads as framed while one too narrow looks undersized.
Decide whether you want it flush or wider, then set the panel size, since the example Home Depot build uses an 18-by-60-inch plywood back panel. Match the width to your mattress and the look you want, because the panel dimension drives every later cut, and getting it right at the planning stage avoids reworking the frame.
Choose Shelf Depth and Placement
Shelf depth decides what fits without crowding the bed, so choose a modest depth and a height that clears pillows. The IKEA NORDLI shelf is about 12 inches wide, 10.6 inches deep, and 4 inches high, so use that as a guide, since a shelf around 10 to 12 inches deep holds a phone, a book, and a lamp without projecting too far.
Place the shelf above pillow height so it clears the bedding, and keep it shallow enough not to overhang the sleeper. Mark the height before building, because a shelf set too low crowds the pillows while one too deep looms over the bed, so plan the placement to suit how you sit up and reach from the mattress each night.
Plan Cable Routing Before Cutting
Plan the cable path before any cuts, since drilling holes and channels afterward is harder and riskier. The NORDLI routes lamp and charger cables through holes behind the shelf, and the BRIMNES includes cord holes, so design the routing first, because a planned channel keeps cords tidy and lets the LED tape run cleanly.
Mark where cords enter, run, and exit, and size the holes for the connectors, since a tight hole can pinch a cable. Route the LED tape through drilled openings and around eased corners, because the tape should not bend sharply at a 90-degree corner, and planning the path avoids forcing a cable where it was never meant to go.
Decide Wall-Mounted vs Bed-Frame-Mounted
Decide the mounting early, since a wall-mounted headboard and a frame-mounted one are built and anchored differently. A wall-mounted panel must anchor to studs or the right wall anchors, while a frame-mounted one bolts to the bed, so choose first, because the mounting determines the bracket layout and the loads it must carry.
Match the mounting to your room and base, since an adjustable base often suits a wall mount while a standard frame suits frame mounting. The BRIMNES must be secured to the wall, so confirm your approach, because a wall mount decouples the headboard from the bed, and the choice shapes how the shelf and lighting attach.
How to Build a Headboard With Shelves and Lights Step by Step
With the plan set, build in order, since each step depends on the last: cut and square the back panel, build and attach the shelf structure, add the cable holes and LED channels, and anchor the finished headboard securely, measuring and checking square at every stage before moving on to the next one.
Cut and Square the Back Panel
Cut the back panel to your planned width, using the example 18-by-60-inch plywood size as a reference adjusted to your mattress. Measure twice and cut once, since the panel sets the whole build, so check the panel is square by comparing diagonals, because an out-of-square panel throws off every shelf and frame piece added later.
Sand the edges and dry-fit the frame boards before fastening, since the 1-by-4 frame squares and stiffens the panel. Confirm the fit before driving screws, because dry-fitting catches a misaligned board early, and a squared, stiffened panel is the foundation that keeps the shelves level and the headboard flat.
Build and Attach the Shelf Structure
Build the shelf to your chosen depth, around 10 to 12 inches, and attach it above pillow height with glue and screws. Use the 2.5-inch screws for structural joints and the 1.25-inch #6 screws for lighter attachments, since matching the screw length to the joint keeps the shelf solid without splitting the lumber.
Keep the shelf load path in mind, since the weight must transfer into the frame and ultimately the wall or bed. Attach the shelf into the frame boards rather than just the thin panel, because a shelf fastened only to plywood can pull out under load, and routing the weight into the frame keeps the shelf secure over years of use.
Add Cable Holes and LED Channels
Drill the cable holes and cut the LED channels you planned, sizing each hole for its connector so cords are not pinched. Route the LED tape through the openings and around eased corners, since the tape should not bend sharply at a 90-degree corner, because a hard bend can damage the tape and shorten its working life.
Follow the lighting manufacturer’s connection and termination instructions, since listed low-voltage LED tape has specific rules for joining and powering it. Keep the supply accessible, since the tape runs from a low-voltage driver or plug-in supply, and following the maker’s guidance keeps the lighting safe.
Anchor the Finished Headboard Securely
Anchor the finished headboard to the wall or bed frame using fasteners matched to the surface. Use studs where possible and appropriate anchors elsewhere, because the NORDLI notes different wall materials need different fasteners, and a headboard with a shelf must hold its own weight and the shelf load.
Confirm the anchor rating against the combined weight, since the headboard, shelf, and whatever sits on it all load the fasteners. Secure it firmly, because the BRIMNES is required to be anchored to the wall, and a wall-mounted shelf headboard not properly anchored can pull loose, so the anchoring makes the build safe.
Frequently Asked Questions
These answers cover what DIY builders ask most about a shelf-and-light headboard, from which lighting is safe to use to whether you can wire an outlet into it, what anchors a wall-mounted build needs, and how much weight the shelves can carry once the headboard is finished and mounted.
What lighting is safe for a DIY headboard?
Use listed low-voltage LED tape or a plug-in LED strip, since those run on a safe low voltage and plug into an existing outlet. Choose a UL or ETL listed product, because a listed low-voltage system is designed for this kind of use, and it avoids any need to touch the home’s mains wiring while still giving you integrated light.
Route the tape through drilled holes and around eased corners rather than bending it sharply, since a 90-degree bend can damage it. Follow the maker’s connection instructions for listed LED tape, and keep the low-voltage supply accessible so you can service the lighting later without opening the headboard.
Can I wire an outlet into a DIY headboard?
Not with improvised mains wiring, since building an unapproved 120-volt outlet into furniture is unsafe and outside DIY carpentry. If you want built-in receptacles or USB power, use a listed furniture power unit, since UL treats furniture power as its own category, which is safer than a homemade connection.
For permanent 120-volt wiring, have the work done by a licensed electrician to local code rather than hiding splices in the wood. Keep mains work out of the headboard, because concealing improvised wiring in a structure is a fire risk, and a listed power unit or professional wiring keeps the build safe.
What anchors do I need for a wall-mounted headboard?
It depends on the wall, since different wall materials need different fasteners rather than one universal anchor. Use wood screws into studs where possible and appropriate anchors, such as toggles for drywall or masonry anchors for brick, because the NORDLI notes different wall materials require different fasteners.
Match the anchor rating to the combined weight of the headboard, shelf, and its contents, since the fasteners carry all of it. Confirm the hold is solid, because the BRIMNES is required to be anchored to the wall, and a screw or anchor size taken from one example project is not a universal rule for every wall type and load.
How much weight can the shelves hold?
Keep shelf loads modest and evenly distributed, since a DIY shelf is only as strong as its attachment to the frame and wall. For reference, the IKEA NORDLI uses a shallow shelf around 12 by 10.6 by 4 inches for light items, so plan for a phone, a book, and a small lamp rather than heavy objects that could overload the shelf.
Attach the shelf into the frame boards and route the load into the wall anchors, since a shelf fastened only to thin plywood can pull out. Distribute weight across the shelf rather than concentrating it, because an evenly loaded, well-anchored shelf holds reliably, while a heavy point load is where a DIY shelf fails.
Final Thoughts
Building a diy headboard with shelves and lights safely means planning the width, shelf depth, and cable routing first, then cutting a square panel, attaching the shelf, routing listed low-voltage LED tape, and anchoring to the wall. Keep mains wiring out of the structure and keep shelf loads modest.