Key takeaways
- A diy corner fireplace tv stand needs two separate plans: a stable media cabinet shaped for the corner and an electric firebox expressly approved for the enclosure you intend to build. Measure the walls, TV support, and insert manual before…
A diy corner fireplace tv stand needs two separate plans: a stable media cabinet shaped for the corner and an electric firebox expressly approved for the enclosure you intend to build. Measure the walls, TV support, and insert manual before cutting plywood. Never turn an ordinary heater into a built-in fireplace by surrounding it with wood.
As an Amazon Associate we earn from qualifying purchases.
By KK Home Furnishings Editorial Team
Plan and Measure Your Corner Fireplace TV Stand
The corner shape saves usable wall space only when the finished cabinet fits the actual room and leaves room for ventilation, cords, and access. Start with a corner TV cabinet design, then check whether the specific firebox is approved for custom mantel installation. If either requirement cannot be verified, keep the fireplace separate from the TV stand.
Map the Corner, TV Base, and Walking Clearance
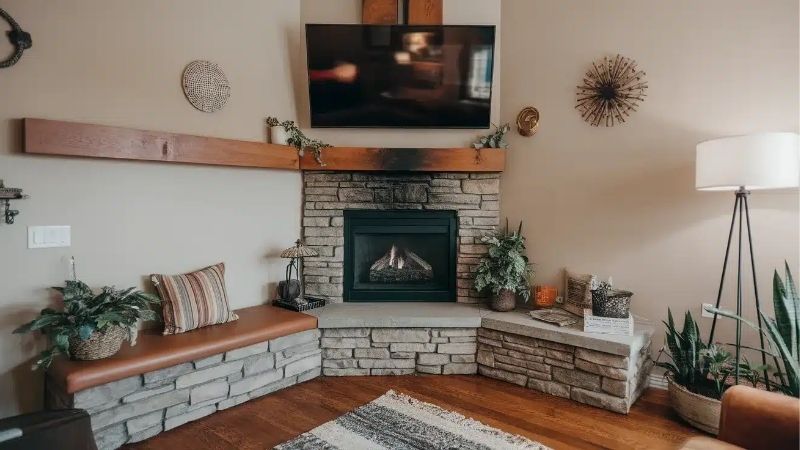
Measure along both walls from the corner, noting baseboard depth, outlets, heating registers, and nearby doors. Use cardboard or painter’s tape to outline the cabinet top at floor level. Then trace the expected front edge and confirm that the arrangement does not pinch a passage or prevent you from opening storage doors.
A Kreg-hosted Corner TV Stand plan by Nick + Alicia provides a concrete furniture reference: it lists a 45-inch-wide plywood top, an 18-inch cabinet depth in its cut list, and an intended TV size up to 50 inches [Kreg Tool, accessed October 2026]. Those figures describe that one unheated design, not a certified fireplace enclosure or a universal TV load rating.
Select a Firebox Approved for a Custom Enclosure
Choose the exact electric firebox before designing its opening. Obtain the installation sheet and confirm that it explicitly permits custom mantel or enclosure construction; a free-standing stove or plug-in room heater should not be boxed into furniture. Check the specified opening width, height, depth, air paths, and access to controls and service parts.
For an example with documented requirements, Dimplex lists an opening of 25.0 inches wide, 18.5 inches high, and 10.0 inches deep for its PF2325 firebox in a non-Dimplex mantel [Dimplex, PF2325/PF3033 manual]. The same manual requires continuous rear intake air. These measurements apply to that named model only, not to every insert or console.
Make a Structural Plan Before Choosing the Finish
Keep the cabinet structure separate from the fireplace housing. The TV support belongs on a top and frame designed to carry its actual base footprint and weight, while the firebox sits in the manufacturer-approved mounting space. Plywood case panels, dividers, and a supported base do the structural work; trim, doors, and molding provide the appearance.
Kreg’s corner stand reference uses 3/4-inch plywood for its main panels and 1/4-inch plywood for some back covers [Kreg Tool, accessed October 2026]. That material list is useful for planning panel construction, but it does not establish the weight rating of a modified design. If an insert opening removes important supports, have a qualified cabinet builder check the revised load path.
| Material or Tool | Size or Spec | Cost Tier | Substitute |
|---|---|---|---|
| Approved electric firebox | Model-specific custom-mantel installation manual | Major component | Use a compatible fireplace console kit instead |
| Case plywood | 3/4-inch panels in cited Kreg corner-TV plan | Core material | Documented engineered-panel cabinet plan |
| Back or bracing panels | 1/4-inch rear covers in cited furniture plan | Core material | Engineer-approved bracing layout |
| Corner layout tools | Tape, square, bevel gauge and cardboard template | Low to moderate | Professional site measuring service |
| Saw and joinery | Supported cuts, suitable drill and specified screws | Tool-dependent | Cabinet shop precut panels |
| Airflow and power access | Follow the exact firebox manual and local electrical rules | Safety essential | Choose a different approved insert/location |
How to Build a Corner Fireplace TV Stand Step by Step
The steps below build the corner-shaped furniture first and install an approved appliance only after the completed structure matches its manual. They do not authorize changes to the heater housing or household wiring. Where there is no approved custom-enclosure specification, stop before the firebox installation and use a purpose-built fireplace TV stand.
Step 1: Template the Corner Footprint and Door Swing
Put a temporary template on the floor with the planned front width, angled or shortened back edges, and wall setbacks. Mark the locations of wall outlets and the route to the nearest accessible connection. Open any adjacent room door fully while the template is in place. This is often where a neat-looking drawing reveals an inconvenient obstruction.
Confirm the angle of the walls rather than presuming that the room corner is perfect. The cited Kreg corner cabinet uses 45-degree rear cuts in its published bottom-panel instructions, but your corner may need a different scribe or a little clearance for uneven drywall [Kreg Tool, accessed October 2026]. Keep the physical cabinet level instead of forcing it against crooked walls.
Lay out separate zones for the TV base, the insert, and components such as a streaming box. Do not let the planned television feet hang beyond the top or overlap a heat outlet. If your design changes the height of the screen, sit in the intended viewing position and check the eye line before committing to a cut list.
Step 2: Cut and Assemble the Supporting Corner Case
Work from a single, consistent plan with a documented panel layout. Cut the top and bottom to the template, and prepare the side and internal support panels. Dry-fit the components on a flat surface; check that the front remains straight, the case is square where intended, and the back will clear the wall when the unit is set in its corner.
Where the referenced furniture plan uses pocket-hole joints, it pairs glue with specified screws and places internal partitions beneath the top [Kreg Tool, Corner TV Stand]. Use joinery matched to your own panel thickness and material. A decorative face frame does not replace those supports, and a thin back cover must not be assumed to carry a large screen.
Fasten the structural panels and allow adhesives to cure under their product instructions. Before closing the rear, verify that the planned firebox cavity does not interrupt load-bearing dividers without engineered replacement supports. The area above the insert must have an independent, defensible load path for the TV instead of depending on the firebox as a cabinet post.
Step 3: Form the Firebox Opening Using Its Manual
Mark the fireplace opening from the specific insert’s installation drawing. Check where the appliance physically bears on the cabinet, which fasteners are permitted, and which surfaces must remain open. Preserve the manufacturer’s stated interior dimensions even if a larger decorative surround would look more balanced; the opening cannot be reduced to suit trim.
The Dimplex PF2325 example calls for a 25.0-inch-wide by 18.5-inch-high by 10.0-inch-deep custom enclosure, and its PF3033 sibling has different dimensions [Dimplex, PF2325/PF3033 manual]. Treat both as model examples only. An opening copied from a generic online plan is not acceptable evidence of safe fit for another model.
Do not fasten combustible decoration over heater discharge, return air, or required service areas. Route material cuts and any appliance screws as its manufacturer shows. If the manual has no provision for installation inside this kind of cabinet, leave the heater uninstalled. Ask the maker or a qualified installer whether an alternative approved firebox is appropriate.
Step 4: Preserve Rear Intake, Front Exhaust, and Cord Access
A corner unit often sits close to two walls, so the rear cavity may be more restricted than the front suggests. Check the firebox’s required intake and exhaust locations while the cabinet is still open. Dimplex specifies 35 square inches of continuous rear intake air for its PF2325/PF3033 installation and a minimum 3/8-inch mantel-to-wall setback [Dimplex manual].
Those Dimplex figures are not a clearance standard for other brands. Do not assume a decorative grille offers enough airflow merely because it has holes; verify the usable opening and the manufacturer’s drawing. Keep power cords out of unfinished wood edges, pinch points, storage-door travel, and hot exhaust paths. The plug must remain accessible for disconnection.
Most importantly, do not add an outlet or run new branch-circuit wiring as a furniture DIY shortcut. The cited Dimplex manual calls for a properly grounded 120-volt circuit and warns that new circuits or outlets should be installed by a qualified electrician [Dimplex]. If your suitable wall outlet is in the wrong place, resolve that before enclosing the firebox.
Step 5: Fit Shelves, Front Trim, and Service Access
With the structural box stable and the heater cavity mapped, dry-fit shelving and cabinet fronts. Keep electronic storage separate from the firebox’s airflow route. A streaming player may fit in a shallow side bay, but a receiver or gaming console needs the clearance stated in its own manual. Do not put a shelf directly across a required vent to gain storage.
For a corner cabinet, hinges and pulls must also clear the adjacent wall when opened. Test the door swing before fixing the face frame, and avoid doors that make the appliance power connection impossible to reach. A removable service panel should be treated as an access feature, not a substitute for installation clearances or a reason to conceal electrical connections.
Apply trim only after confirming that it cannot cover the heater fascia, air paths, labels, fasteners, or controls. Sand cabinet edges and apply paint or stain before placing the electrical appliance inside. Respect the coating’s stated ventilation, handling, and cure instructions. Decorative faux-stone or shiplap panels should be used only where the firebox manual permits those materials.
Step 6: Anchor the Cabinet, Install the Unit, and Commission Safely
Move the dry, finished cabinet into its final position with help when necessary. Check for rocking and confirm the top is supported and suitable for the actual television. Fix the furniture anchor in suitable wall structure according to its instructions and secure any freestanding TV with a compatible restraint. The U.S. CPSC urges anchoring TVs and furniture [CPSC, 2026].
Install the firebox only in the way described by its own manual, using only approved mounting points and preserving all specified clearances. The Dimplex PF2325/PF3033 guide says to plug its heater directly into a wall receptacle, not an extension cord or power strip [Dimplex manual]. Do not modify the cord, grounding connection, heater chassis, or thermal protection.
First test with the area clear of stored objects and verify that the controls operate without unusual smells, noise, or repeated breaker trips. Stop use if the unit malfunctions or air circulation seems obstructed, and seek qualified service rather than opening the heater. Recheck accessibility and the cabinet’s restraint once the TV and shelf items have been placed.
Frequently Asked Questions
Corner fireplace furniture raises practical decisions that ordinary TV cabinets do not: how to judge a suitable corner, when a purchased kit is wiser, and whether the firebox can safely share a room circuit. These answers address the choices left after planning the build rather than repeating the assembly sequence.
Is a Corner Fireplace TV Stand Better Than a Straight One?
It can be a good use of a difficult corner when the front edge leaves enough walking room and the viewing angle works from the sofa. However, a corner cabinet can take more floor area than its angled back suggests. Mock up its front width, depth, and open door footprint before deciding that it will make a small room feel larger.
A straight console may be preferable when there is a long uninterrupted wall, a large TV pedestal, or limited access to an electrical outlet in the corner. Compare the real room layout, not just the advertised furniture widths. The correct shape is the one that accommodates the TV and approved firebox without squeezing safe access and airflow.
Can I Turn Any Corner TV Stand Into a Fireplace Stand?
No. An ordinary media cabinet has not necessarily been designed for the heat, intake airflow, exhaust location, mounting method, or service access of a particular firebox. Cutting a rectangular hole in the front does not turn it into an approved enclosure. Even a cabinet that feels sturdy can fail the fireplace’s installation requirements.
Only consider conversion when the exact firebox permits the intended custom enclosure and the revised furniture structure can safely support its own loads. A purpose-designed electric fireplace TV console may be a better option when the original cabinet has no load documentation or when adding the opening would require removing essential internal bracing.
What If I Have Only One Wall Outlet in the Corner?
Start by checking the electrical requirements printed in the appliance’s own manual and the outlet’s condition. For example, Dimplex calls for a 15-amp, 120-volt circuit on its PF2325/PF3033 family and notes that other appliances on that circuit can contribute to breaker trips [Dimplex manual]. This requirement belongs to those models, not every fireplace.
Avoid adding a portable power strip behind the new cabinet as a workaround. If the circuit is unsuitable, the receptacle is inaccessible, or a new location is needed, consult a qualified electrician. The U.S. Fire Administration also advises that portable space heaters be connected directly to a wall outlet, not to power strips or extension cords [USFA, accessed October 2026].
Can I Use My Existing TV Without Wall Mounting It?
Possibly, if the finished cabinet has a defensible support capacity, the television feet sit fully on its top, and the TV can be secured independently. Check the exact television manual for weight and base dimensions. Do not infer that a do-it-yourself cabinet is safe for a screen merely because a published plan once described use with a similarly sized TV.
The CPSC advises placing televisions on furniture designed to support them and anchoring furniture and TVs to prevent tip-overs [CPSC, 2026]. If a qualified builder cannot confirm the altered cabinet’s load path, select an appropriate wall mount installed to its manual, or use a certified commercial console. A decorative fireplace opening is never a load-rating certificate.
Final Thoughts
For a diy corner fireplace tv stand, the decisive work happens before cutting: test the footprint in the actual corner, select a firebox approved for custom enclosure use, and preserve the cabinet’s TV load path and documented airflow. If those requirements cannot all be met, build a non-heated corner TV stand or buy a matching fireplace console rather than improvising a heater enclosure.